- Published on
Flutter flavors on Android: dev, uat, and live from one codebase
- Authors

- Name
- Phat Tran
Every app I have shipped talked to more than one backend. There is a dev server the team breaks daily, a UAT server the testers sign off on, and production. If switching between them means editing a constant before each build, someone will eventually ship a build pointed at the wrong server.
Flavors fix this. Each environment becomes its own build with its own application id, so dev, uat, and live can sit next to each other on one phone and there is no doubt which one you are tapping. This post covers Android. iOS needs a different approach with Xcode schemes, and I cover that in the iOS part.
The screenshots in this post are from Flutter 3.13, but everything here works the same on current versions. One thing has gotten easier since then: Flutter 3.16 added a built-in way to read the flavor from Dart, which I cover below alongside the classic method channel approach.
Add a build configuration for each flavor in Android Studio
We want three flavors: dev, uat and live.
From the terminal you launch a flavor with flutter run --flavor <env>. Android Studio needs to be told about them separately, one run configuration per flavor:
- Find
main.dartin the top toolbar and select Edit Configurations.... This opens the Run/Debug Configurations window. - Change the Name field to
dev. - Set Build flavor to
devas well. - Duplicate the dev configuration (the icon in the top left of the window).
- Change
NameandBuild flavoron the copies touatandlive. - Close the dialog. The toolbar now shows
devinstead ofmain.dart.
One warning before you pick your own names: Android does not allow flavor names that start with test.
Set up flavors for Android
Add the flavors to the Gradle config
On Android, the native flavor values live in android/app/build.gradle under the android.flavorDimensions and android.productFlavors keys.
We use them for two things: the flavor-specific applicationId and the flavor-specific display name. A different application id per flavor is what lets all three builds coexist on the same device. It is also permanent. Once the app is on Google Play under an id, that id can never change, so pick it carefully.
Add this inside the android { ... } section:
android {
    // ... all existing things like `sourceSets`, ...

    flavorDimensions "app"

    productFlavors {
        dev {
            dimension "app"
            applicationId "com.andy.cookify.dev"
            resValue "string", "app_name", "DEV Cookify"
        }
        uat {
            dimension "app"
            applicationId "com.andy.cookify.uat"
            resValue "string", "app_name", "UAT Cookify"
        }
        live {
            dimension "app"
            applicationId "com.andy.cookify"
            resValue "string", "app_name", "Cookify"
        }
    }
}
Use the flavor app name in the manifest
Open android/app/src/main/AndroidManifest.xml and replace <application android:label="<old_app_name>"/> with <application android:label="@string/app_name"/>. The app_name string is the resValue we set per flavor in Gradle.
Set the app icon
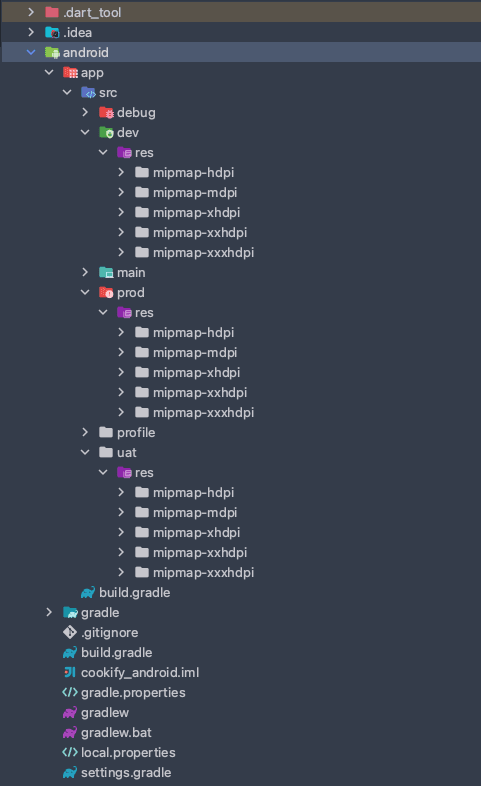
Use Icon Finder or App Icon to generate the icons, then place the folders like this:
Read the flavor in Flutter code
The whole point of this setup is hitting a different API endpoint per environment, so the Dart code needs to know the current flavor.
Either way you read it, the per-environment settings belong in one place. An enhanced enum in a new file lib/app_environment.dart keeps each environment and its config on a single line:
enum AppEnvironment {
  dev('https://api-dev.cookify.io'),
  uat('https://api-uat.cookify.io'),
  live('https://api.cookify.io');

  const AppEnvironment(this.apiBaseUrl);
  final String apiBaseUrl;
}
Add fields the same way as they come up: a web socket URL, a log level, a feature flag default. Everything environment-specific lives here, and the rest of the app just reads apiBaseUrl off the current value.
The modern way: appFlavor (Flutter 3.16+)
Since Flutter 3.16, the framework hands you the flavor directly. package:flutter/services.dart exports an appFlavor constant that contains exactly the value you passed to --flavor at build time, or null if no flavor was used. No native code, no async gap, available before runApp even runs.
Import it at the top of lib/app_environment.dart and add one static getter inside the enum:
import 'package:flutter/services.dart';

enum AppEnvironment {
  // ... the values and apiBaseUrl field from above ...

  static AppEnvironment get current => switch (appFlavor) {
        'uat' => AppEnvironment.uat,
        'live' => AppEnvironment.live,
        _ => AppEnvironment.dev,
      };
}
That is the entire integration. AppEnvironment.current.apiBaseUrl gives you the right endpoint anywhere in the app, and because appFlavor is a compile-time constant, main stays synchronous.
If you are on Flutter 3.16 or later and all you need is the flavor name, use this and skip the next section.
The classic way: a method channel
Before appFlavor existed, the Dart side had to ask the native side which flavor it was built with, over a method channel. The pattern is still worth knowing: it is the same mechanism you reach for when Dart needs any other build-time value from the native project, not just the flavor name.
Open android/app/src/main/kotlin/<your>/<application>/<id>/MainActivity.kt and replace everything except the first line (the package declaration) with the code below. It registers a channel named flavor that answers getFlavor calls with BuildConfig.FLAVOR, a value Android generates from the Gradle config:
import io.flutter.embedding.android.FlutterActivity
import io.flutter.embedding.engine.FlutterEngine
import io.flutter.plugin.common.MethodChannel

class MainActivity : FlutterActivity() {
    override fun configureFlutterEngine(flutterEngine: FlutterEngine) {
        super.configureFlutterEngine(flutterEngine)

        MethodChannel(flutterEngine.dartExecutor.binaryMessenger, "flavor")
            .setMethodCallHandler { call, result ->
                when (call.method) {
                    "getFlavor" -> result.success(BuildConfig.FLAVOR)
                    else -> result.notImplemented()
                }
            }
    }
}
On the Dart side, the flavor arrives asynchronously, so main becomes async and resolves the environment before runApp:
import 'package:flutter/material.dart';
import 'package:flutter/services.dart';

Future<AppEnvironment> environmentFromNative() async {
  final flavor =
      await const MethodChannel('flavor').invokeMethod<String>('getFlavor');

  return switch (flavor) {
    'uat' => AppEnvironment.uat,
    'live' => AppEnvironment.live,
    _ => AppEnvironment.dev,
  };
}

Future<void> main() async {
  WidgetsFlutterBinding.ensureInitialized();

  final environment = await environmentFromNative();
  debugPrint('Started with flavor: ${environment.name}');

  runApp(MyApp(environment: environment));
}
Run the Android app
Use the Android Studio configurations from the first step, or the command line:
flutter run --flavor dev
flutter run --flavor uat
flutter run --flavor live
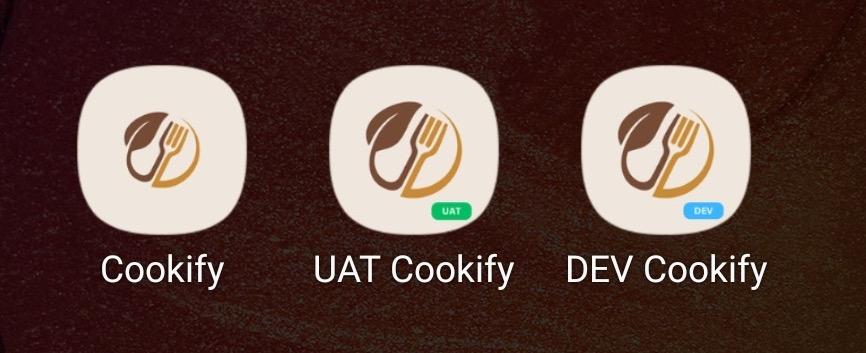
Launch the app with the dev configuration, close it on the device, and look at the app list. The name reads DEV Cookify.
Stop the app, switch the configuration to uat or live, and launch again. All three flavors are now installed side by side on your Android device.
That is Android done. The same result on iOS takes more clicking, because Xcode has no flavor concept and we have to build one out of schemes: Flutter flavors on iOS.