- Published on
Flutter flavors on iOS: dev, uat, and live with Xcode schemes
- Authors

- Name
- Phat Tran
This is the second half of the flavors setup. The Android part covered the Gradle config and the Dart code that reads the flavor at startup. That Dart code does not change here, so this post is only about getting iOS to produce the right builds.
The screenshots in this post are from Flutter 3.13, but the setup is the same on current versions. You also need to be enrolled in the Apple Developer Program if you want to run the app on a physical device.
Set up flavors for iOS
Android took a few lines of Gradle. iOS has no flavor concept at all, so the setup is longer and most of it happens in the Xcode UI.
Try building with a flavor and iOS says so directly:
flutter build ios --flavor dev

The Xcode project does not define custom schemes. You cannot use the --flavor option.
On iOS, a flavor is represented by a custom scheme, and each scheme is backed by its own set of build configurations. We set up the configurations first.
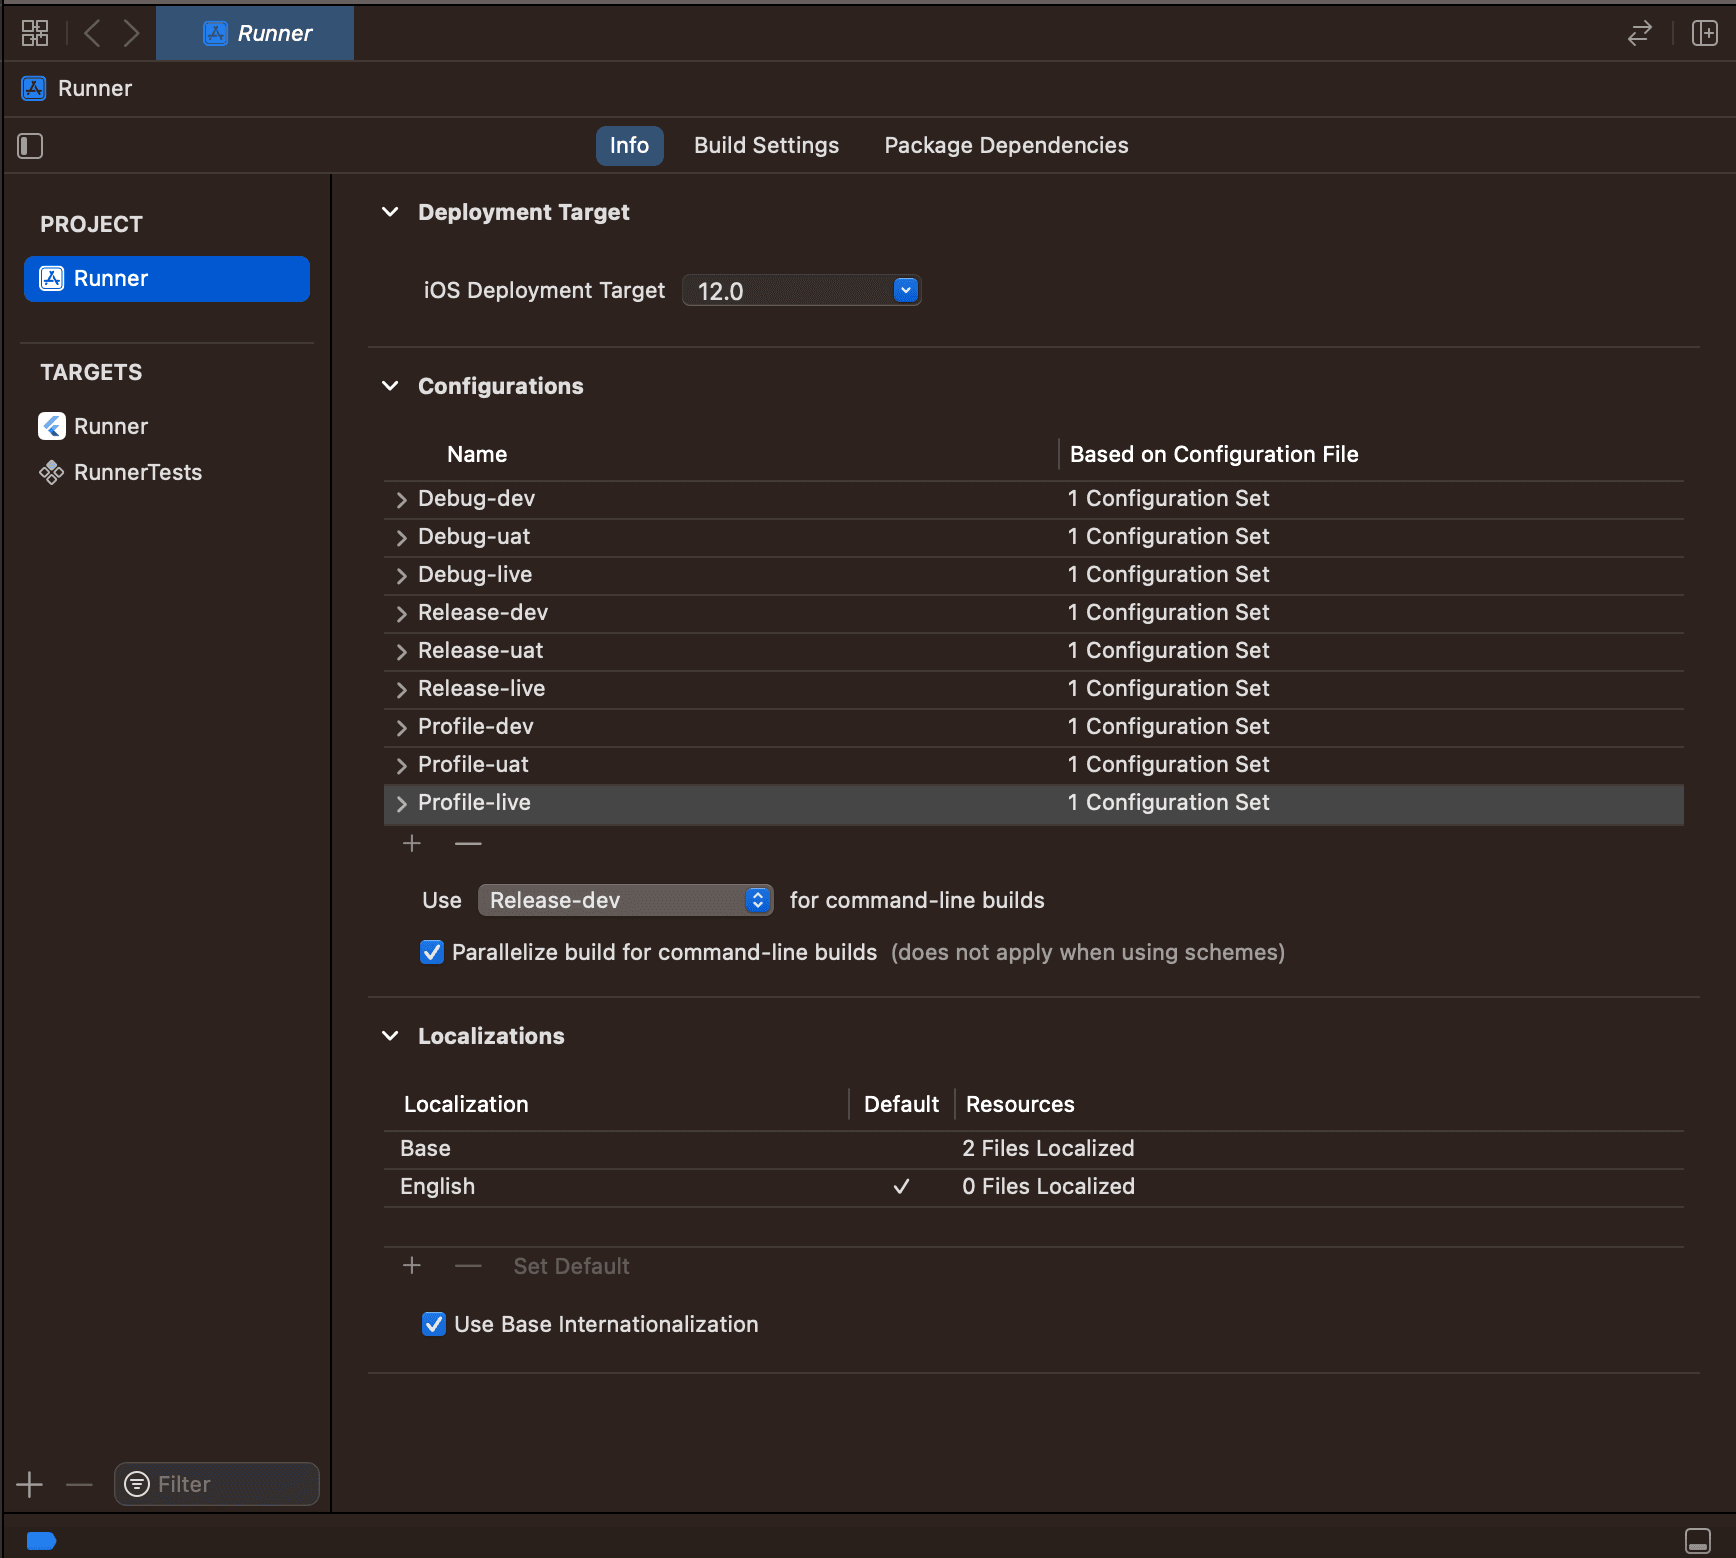
Set up the configurations
- Make sure the root
Runnernode is selected in Xcode. - In the main window, select the
Runnernode belowPROJECT(not belowTARGETS). - Select the
Infotab.
In the Configurations section:
- Rename
DebugtoDebug-dev - Rename
ReleasetoRelease-dev - Rename
ProfiletoProfile-dev - Duplicate
Debug-devand rename the copy toDebug-uat - Duplicate
Release-devand rename the copy toRelease-uat - Duplicate
Profile-devand rename the copy toProfile-uat - Duplicate
Debug-devand rename the copy toDebug-live - Duplicate
Release-devand rename the copy toRelease-live - Duplicate
Profile-devand rename the copy toProfile-live
Every flavor ends up with its own Debug, Release and Profile configuration.
The <Mode>-<flavor> naming is not cosmetic. When you run flutter run --flavor dev, the tool looks for a build configuration named exactly Debug-dev (or Release-dev, Profile-dev, depending on the mode). Misspell one and the build fails with a missing-configuration error, so it pays to be exact here.
Create the custom schemes
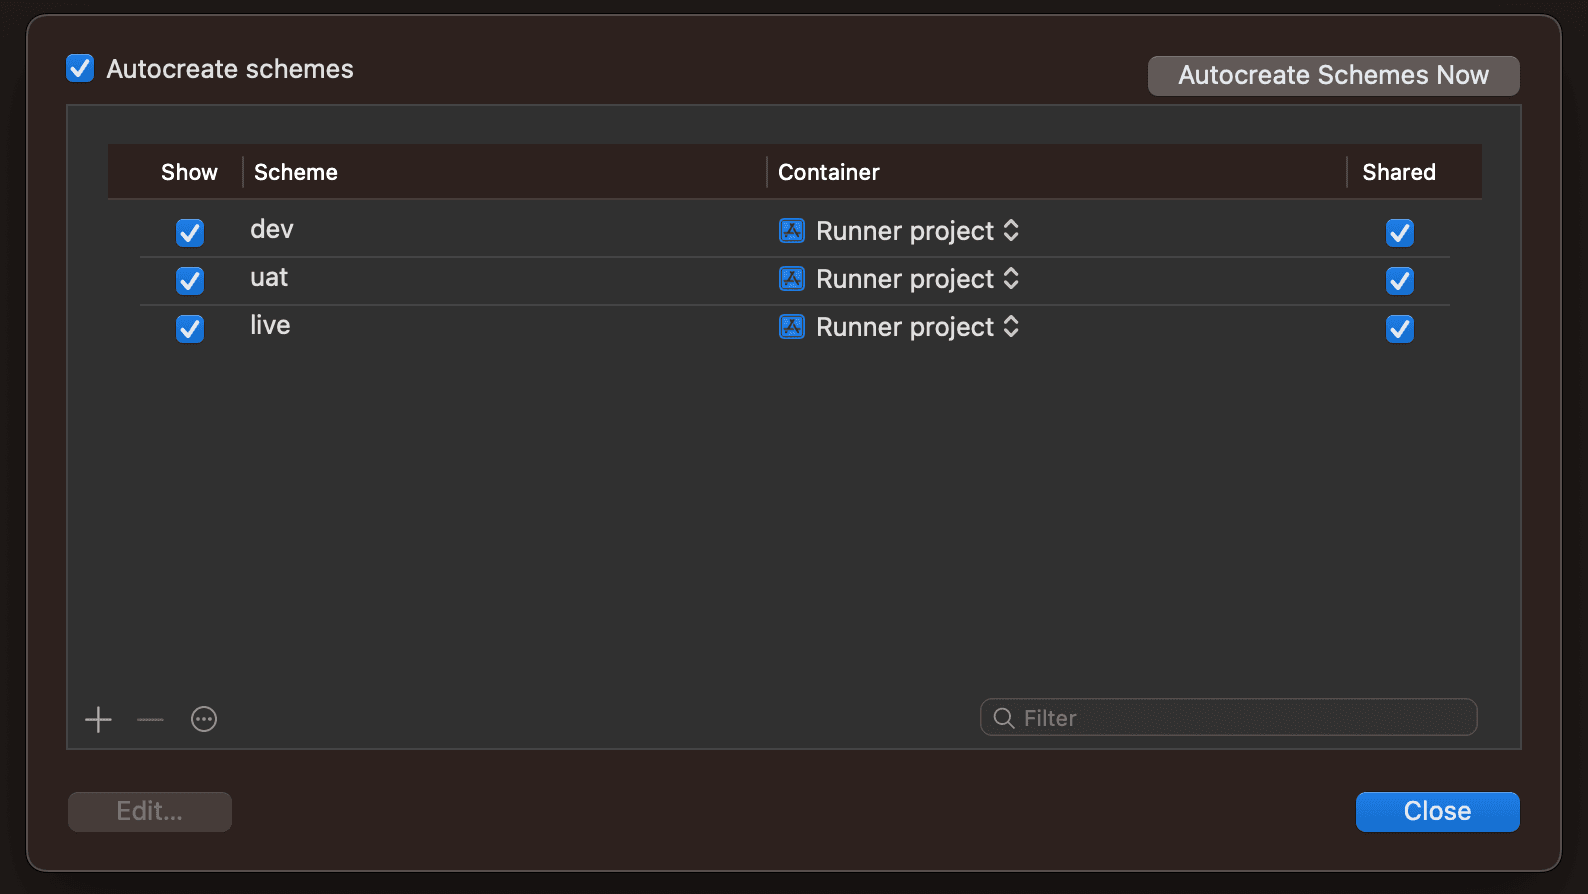
Now the configurations get grouped into schemes:
- Make sure the root
Runnernode is selected in Xcode. - Select
Product -> Scheme -> Manage Schemes...in the main toolbar.
For the dev scheme:
- Select the
Runnerscheme, click the settings icon in the top left and chooseDuplicate. - Rename the scheme to
dev. - Make sure
Sharedis checked. - Point the build configuration at the matching
-devversion.
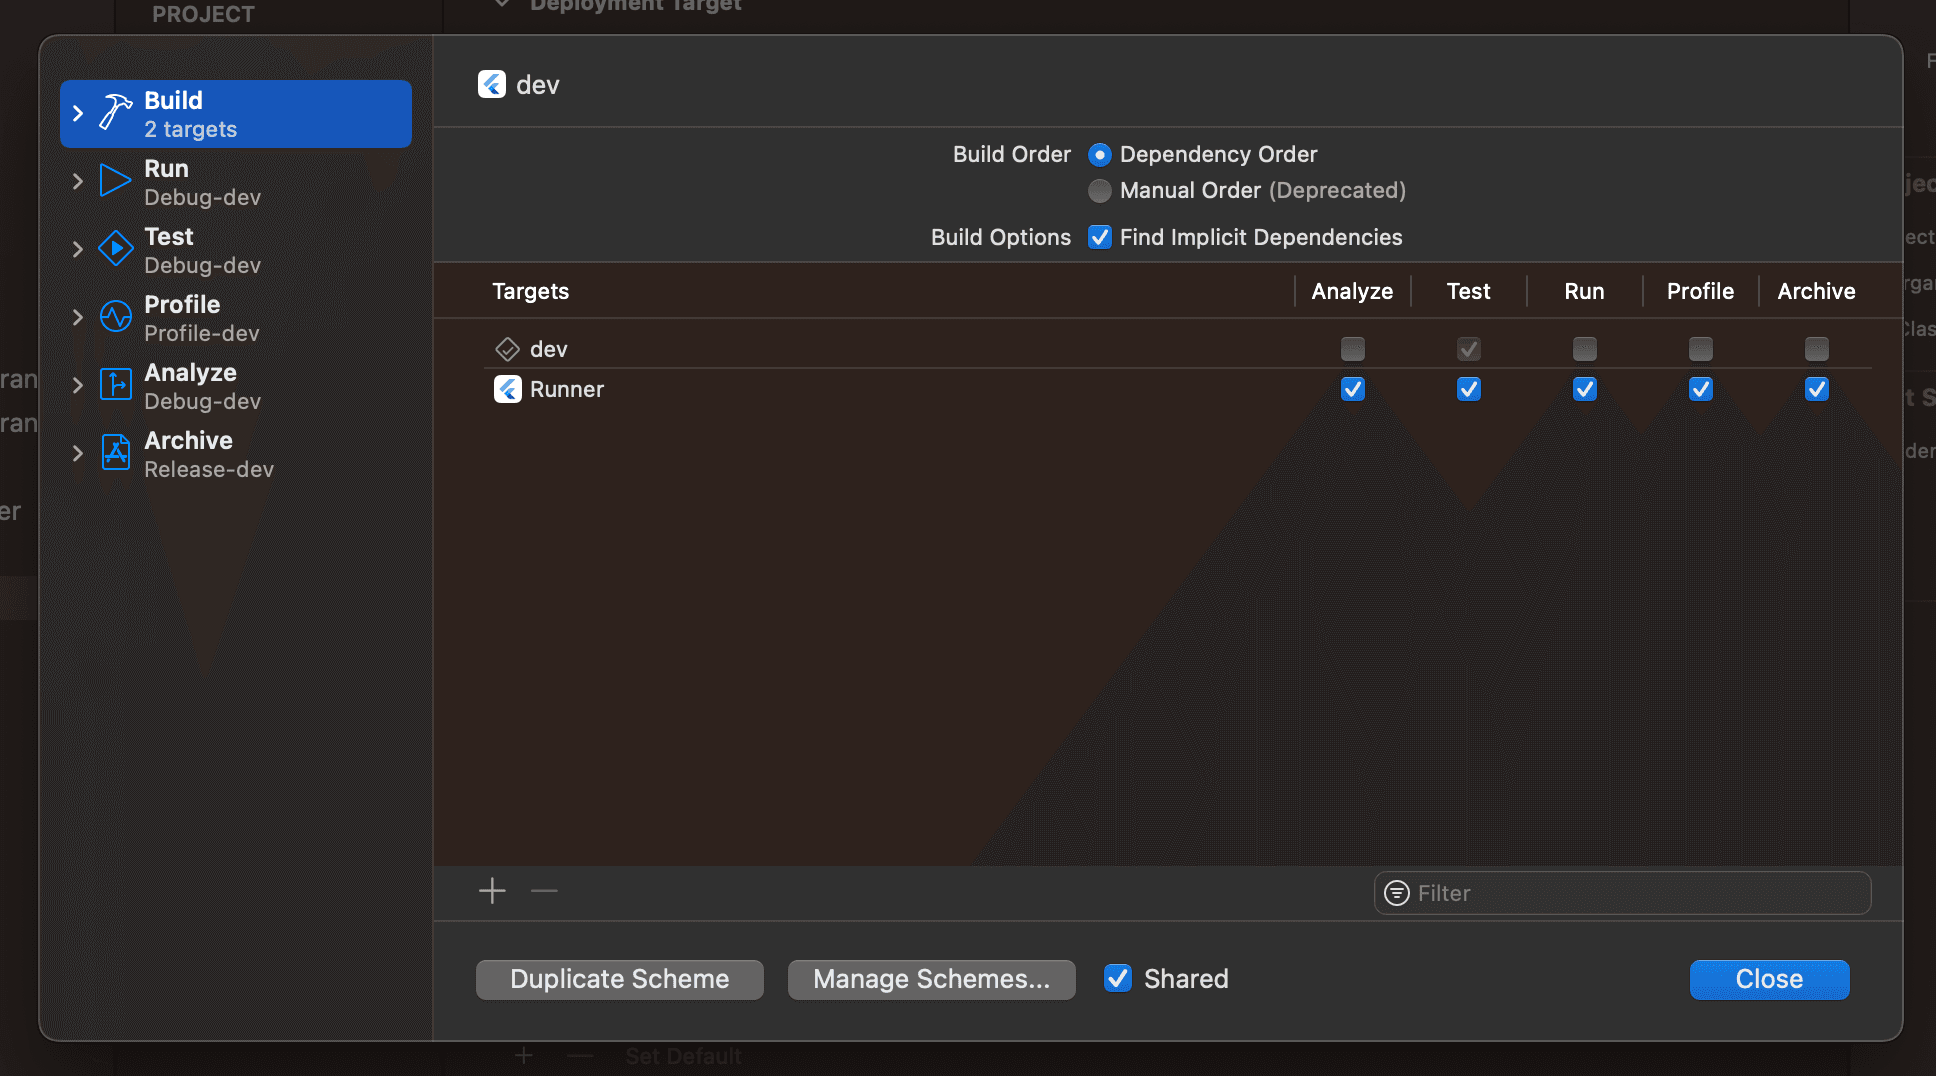
Repeat for uat and live: duplicate the Runner scheme again, rename it, check Shared, and for each section on the left (Run, Test, Profile, Analyze, Archive) select the matching -uat or -live configuration. Then close the dialog.
Set the flavor value per scheme
One shortcut before this section: if you are on Flutter 3.16 or later and only need the flavor name in Dart, you can skip this section and the method channel at the end entirely. The appFlavor constant from the Android part works on iOS too, straight from the schemes you just created. The steps below stay useful on older Flutter versions, and whenever the native side itself needs to know the flavor (say, for a flavor-specific Firebase plist script).
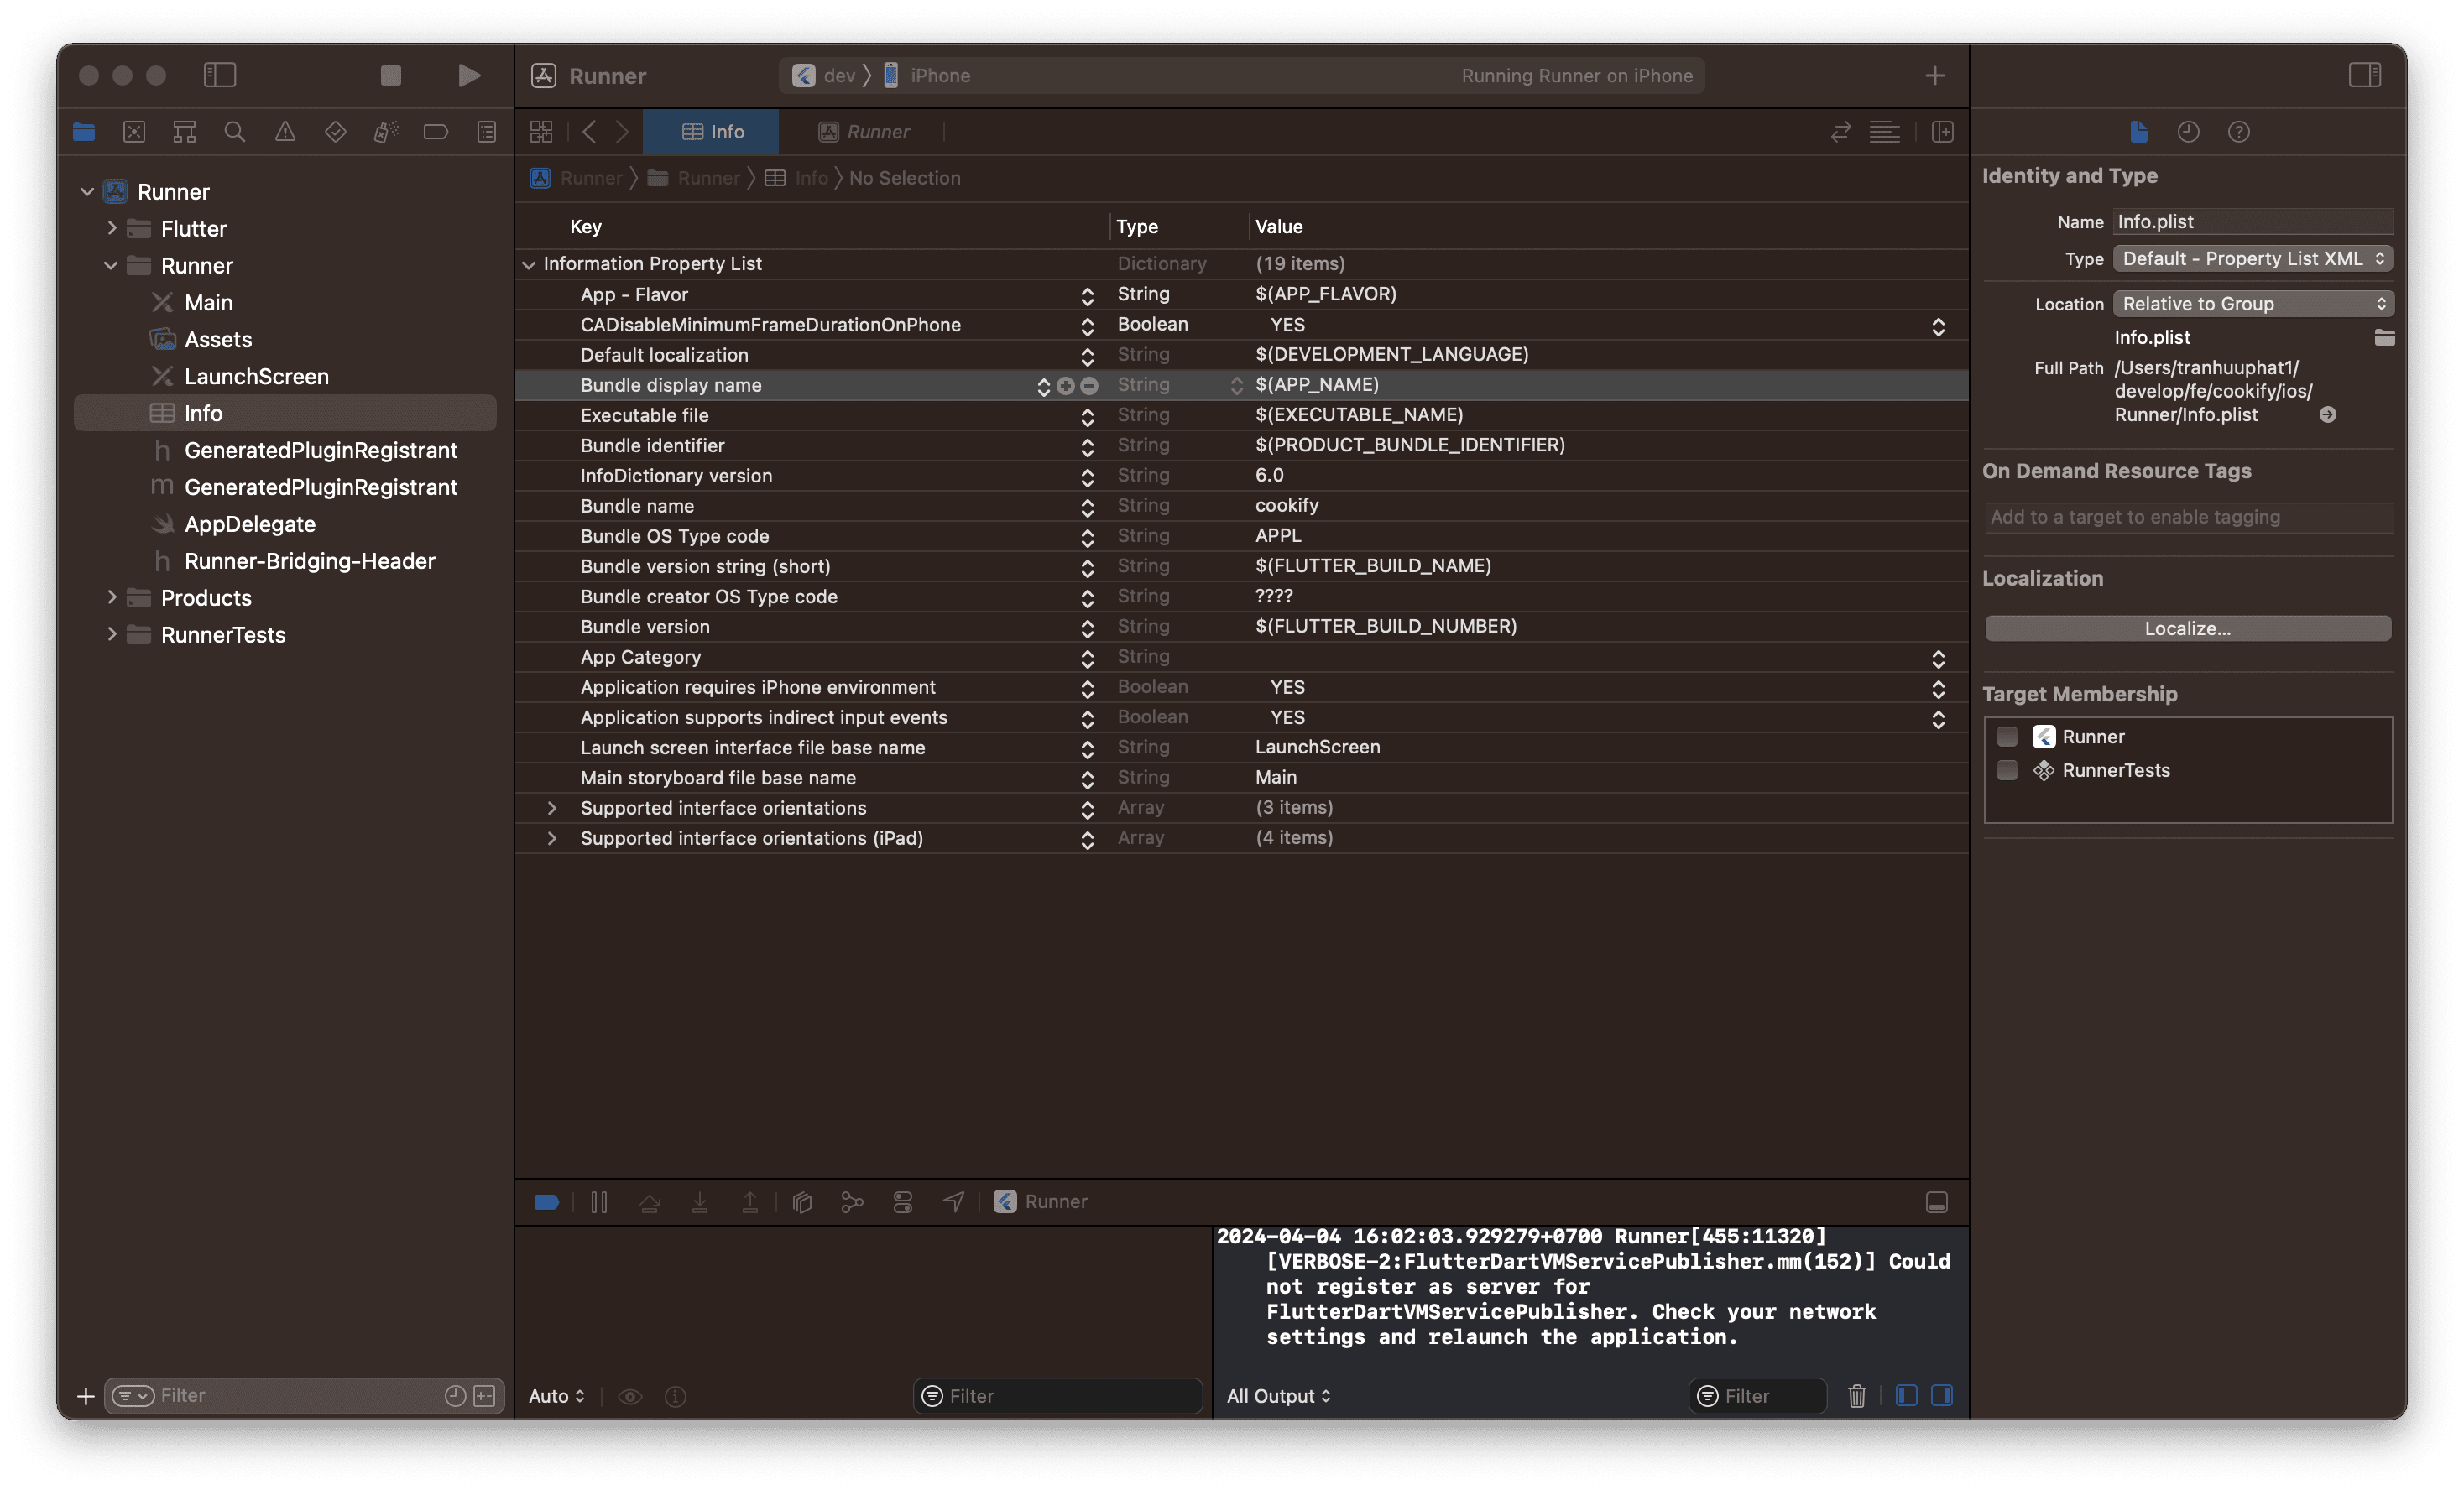
At the end of this post we add a method channel that reads a custom key called App - Flavor from Runner/Info.plist. The key does not exist yet, so add it now.
Open Runner/Info.plist in Xcode and add a new row:
- Key:
App - Flavor - Type:
String - Value:
$(APP_FLAVOR)
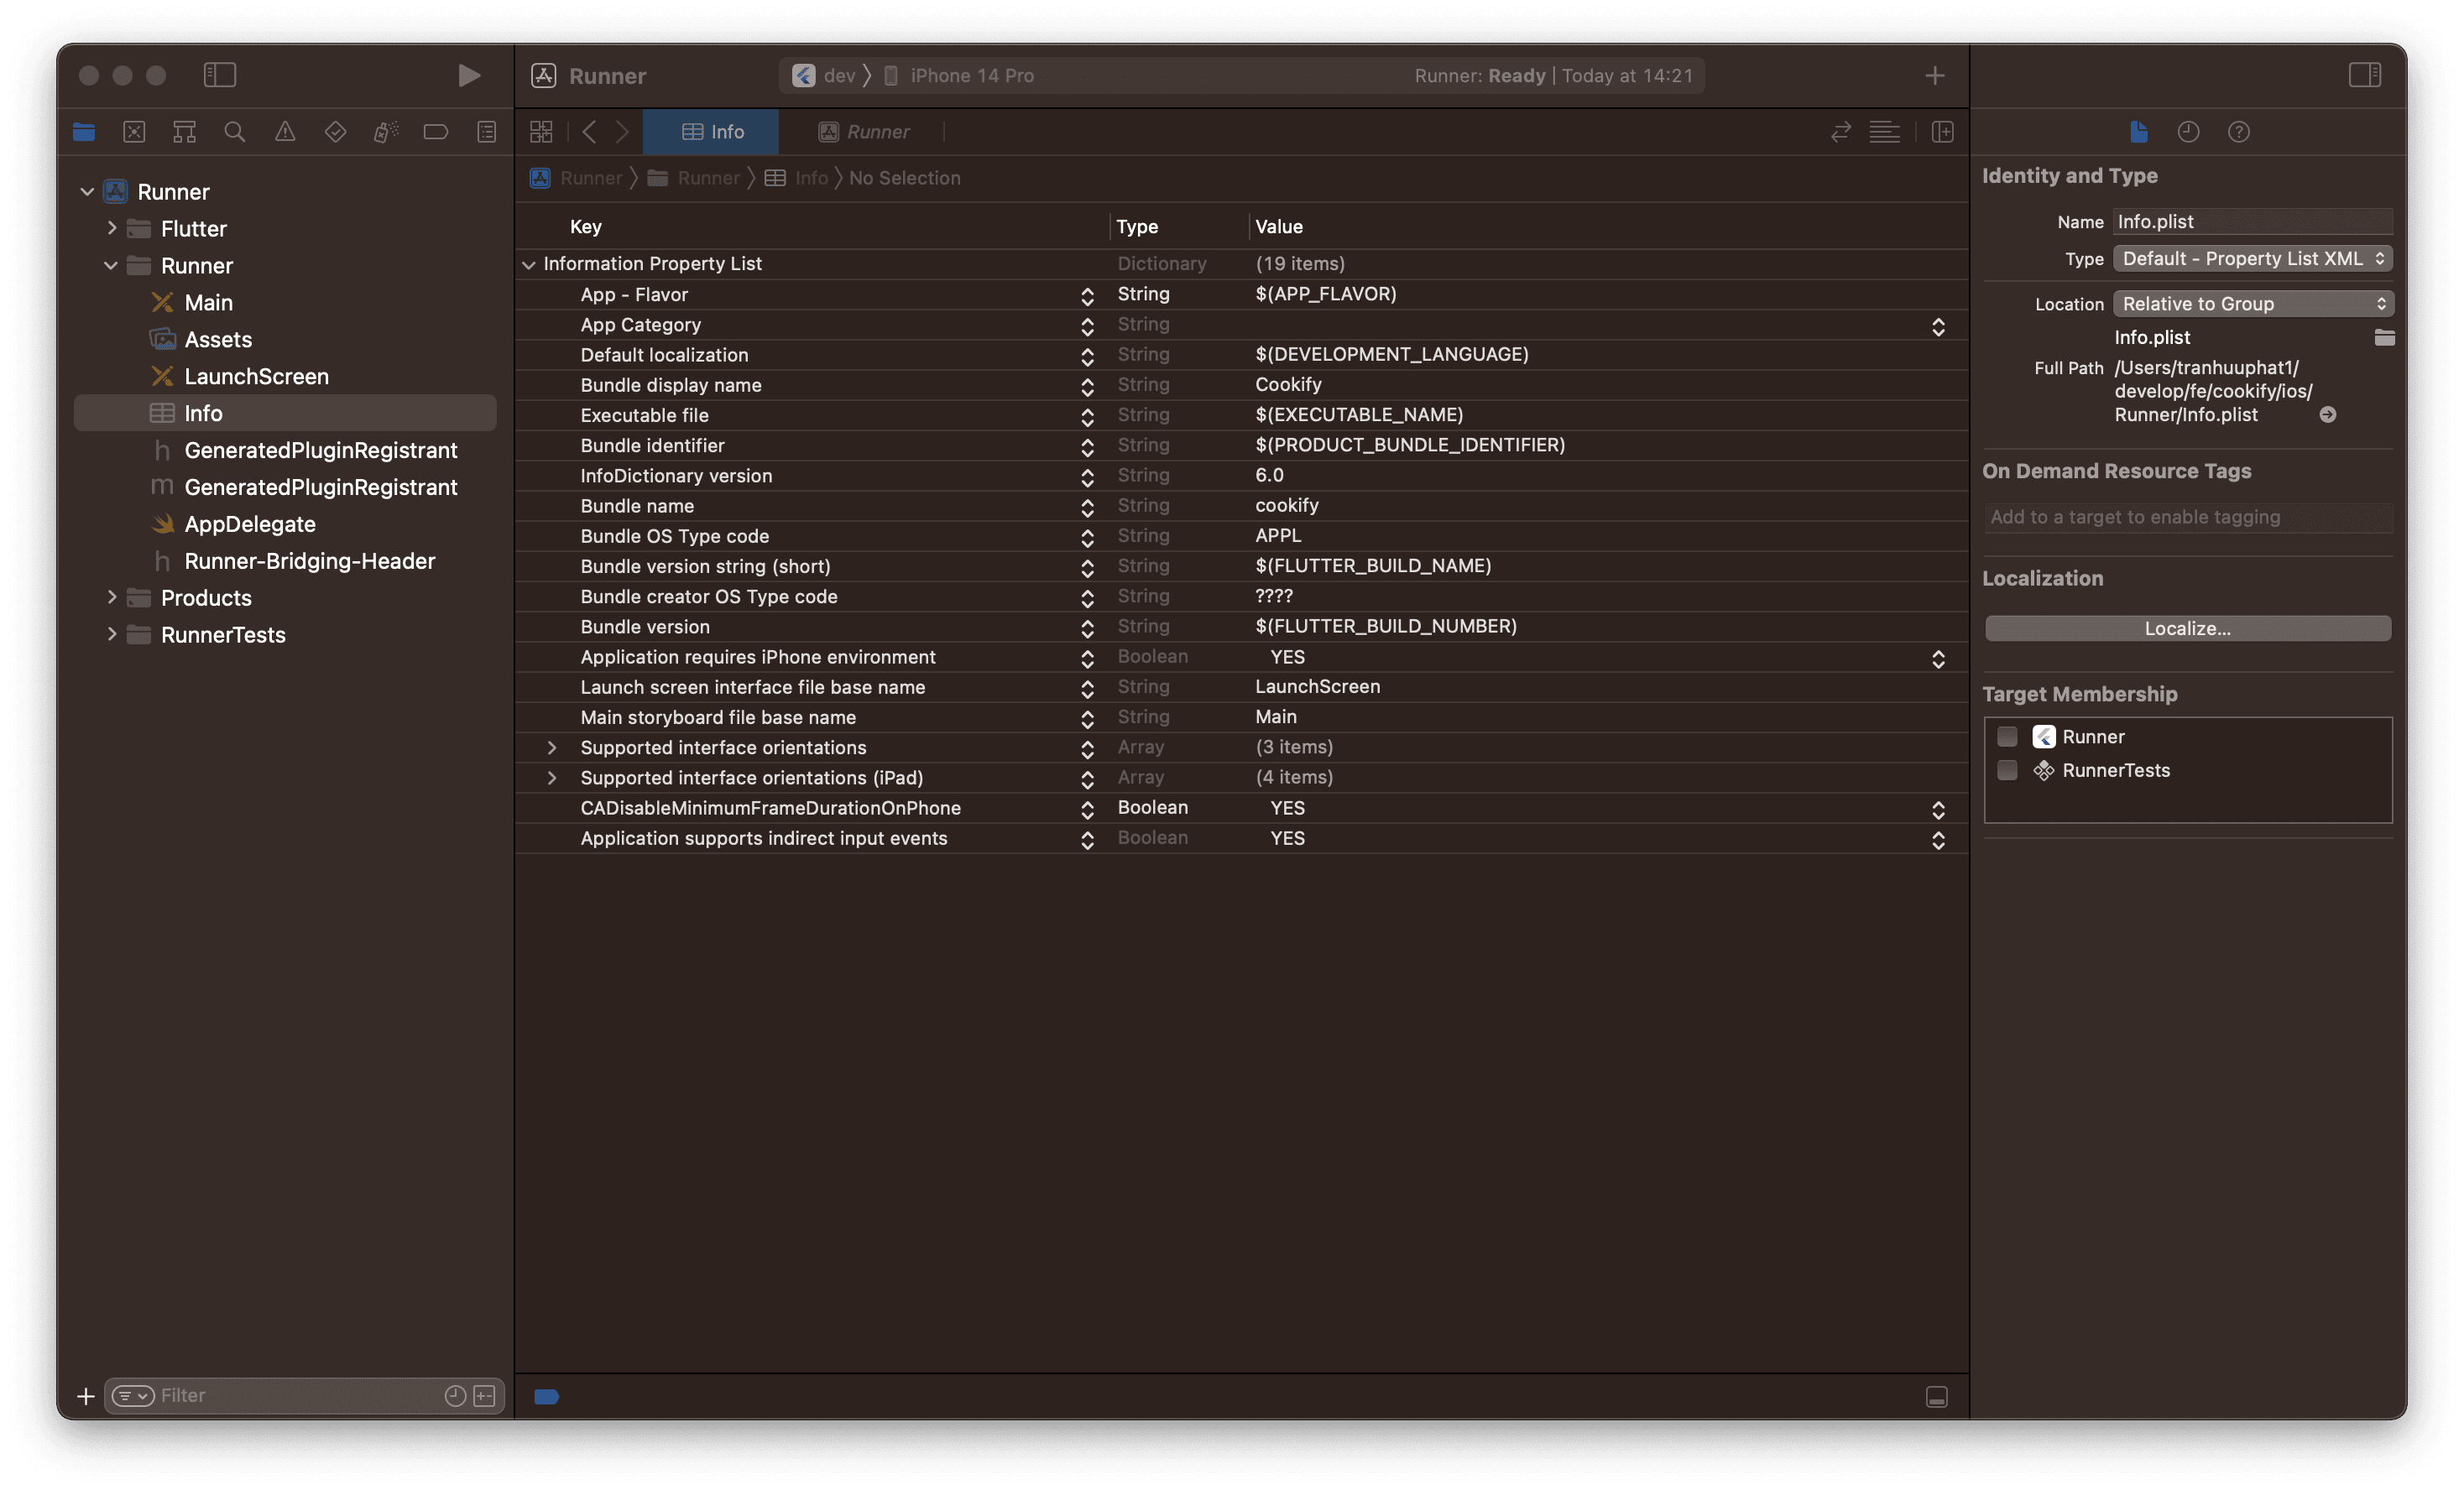
The value points at a build setting we have not created yet either. To create it:
- Select the root
Runnernode in the Xcode project structure - Select
RunnerbelowTARGETS - Select the
Build Settingstab - Click the + to add a new
User-Definedsetting - Name it
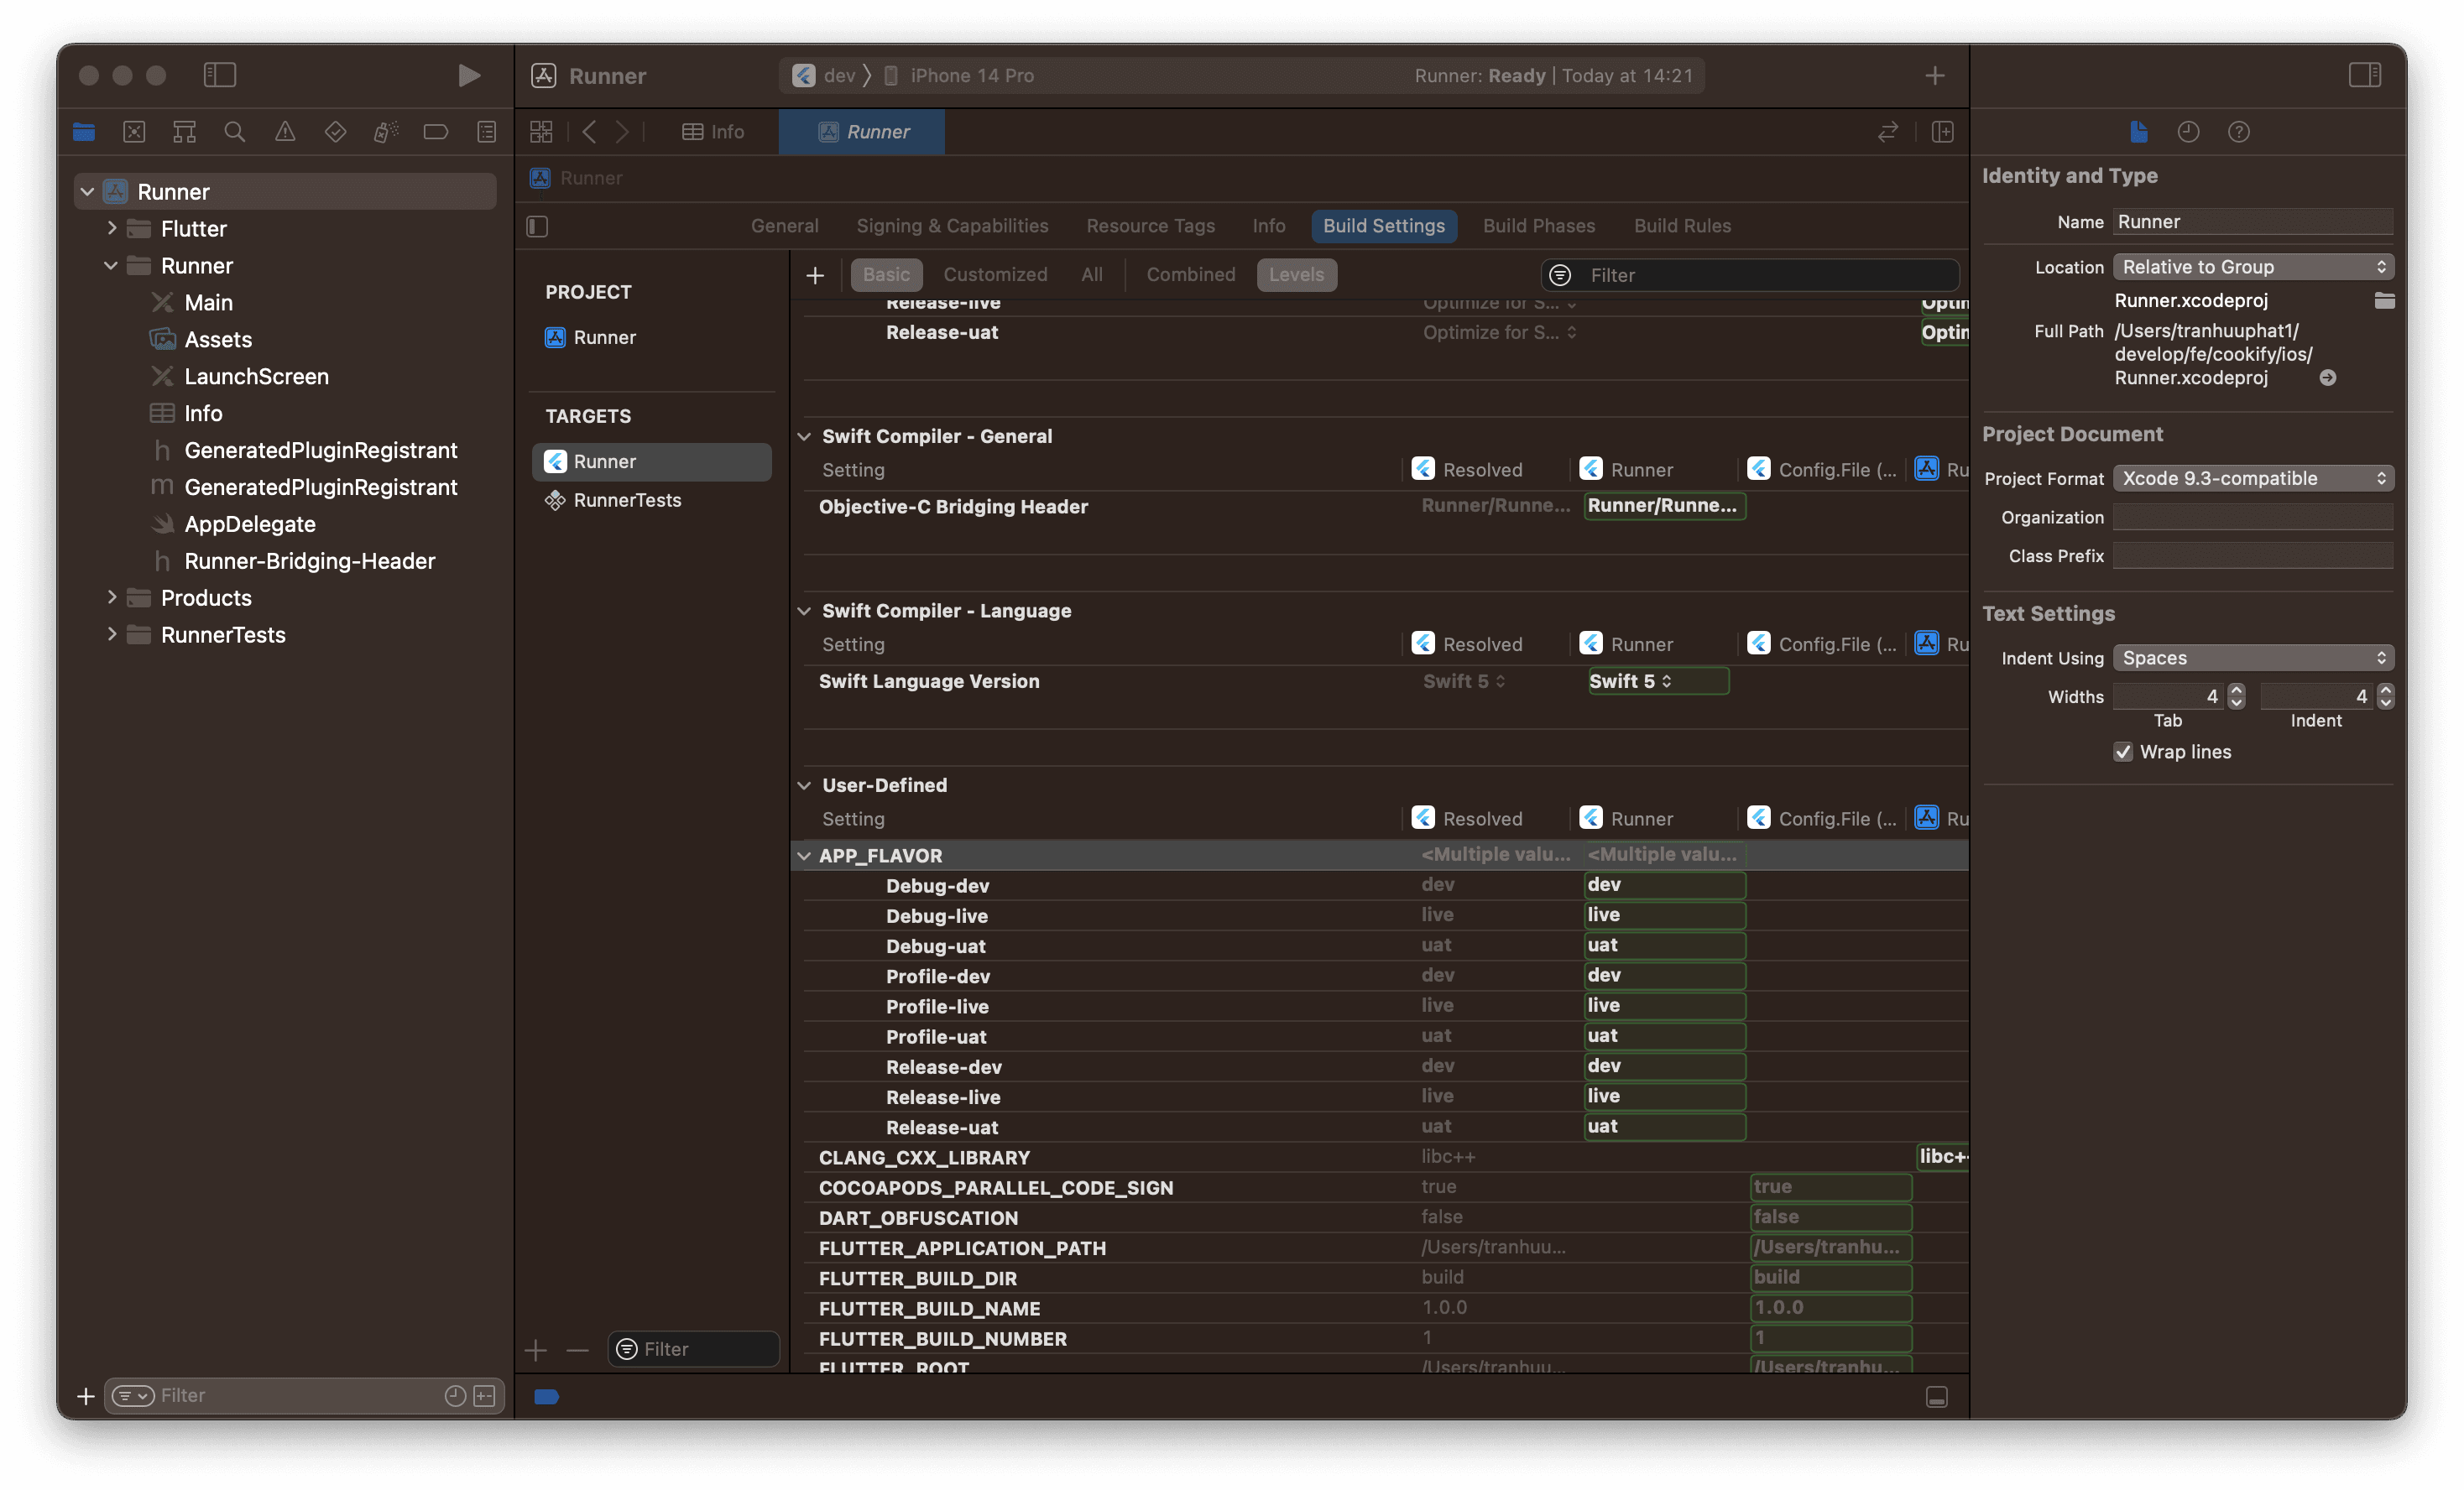
APP_FLAVOR - Expand the row with the little arrow on the left and set the value per build configuration:
- Debug-dev:
dev - Debug-uat:
uat - Debug-live:
live - Profile-dev:
dev - Profile-uat:
uat - Profile-live:
live - Release-dev:
dev - Release-uat:
uat - Release-live:
live
- Debug-dev:
When done, it should look like this:
Set the app name per scheme
Same idea for the display name. Open Runner/Info.plist in Xcode and change Bundle display name:
- Key:
Bundle display name - Type:
String - Value:
$(APP_NAME)
Then back in the Build Settings tab:
- Click the + to add a new
User-Definedsetting - Name it
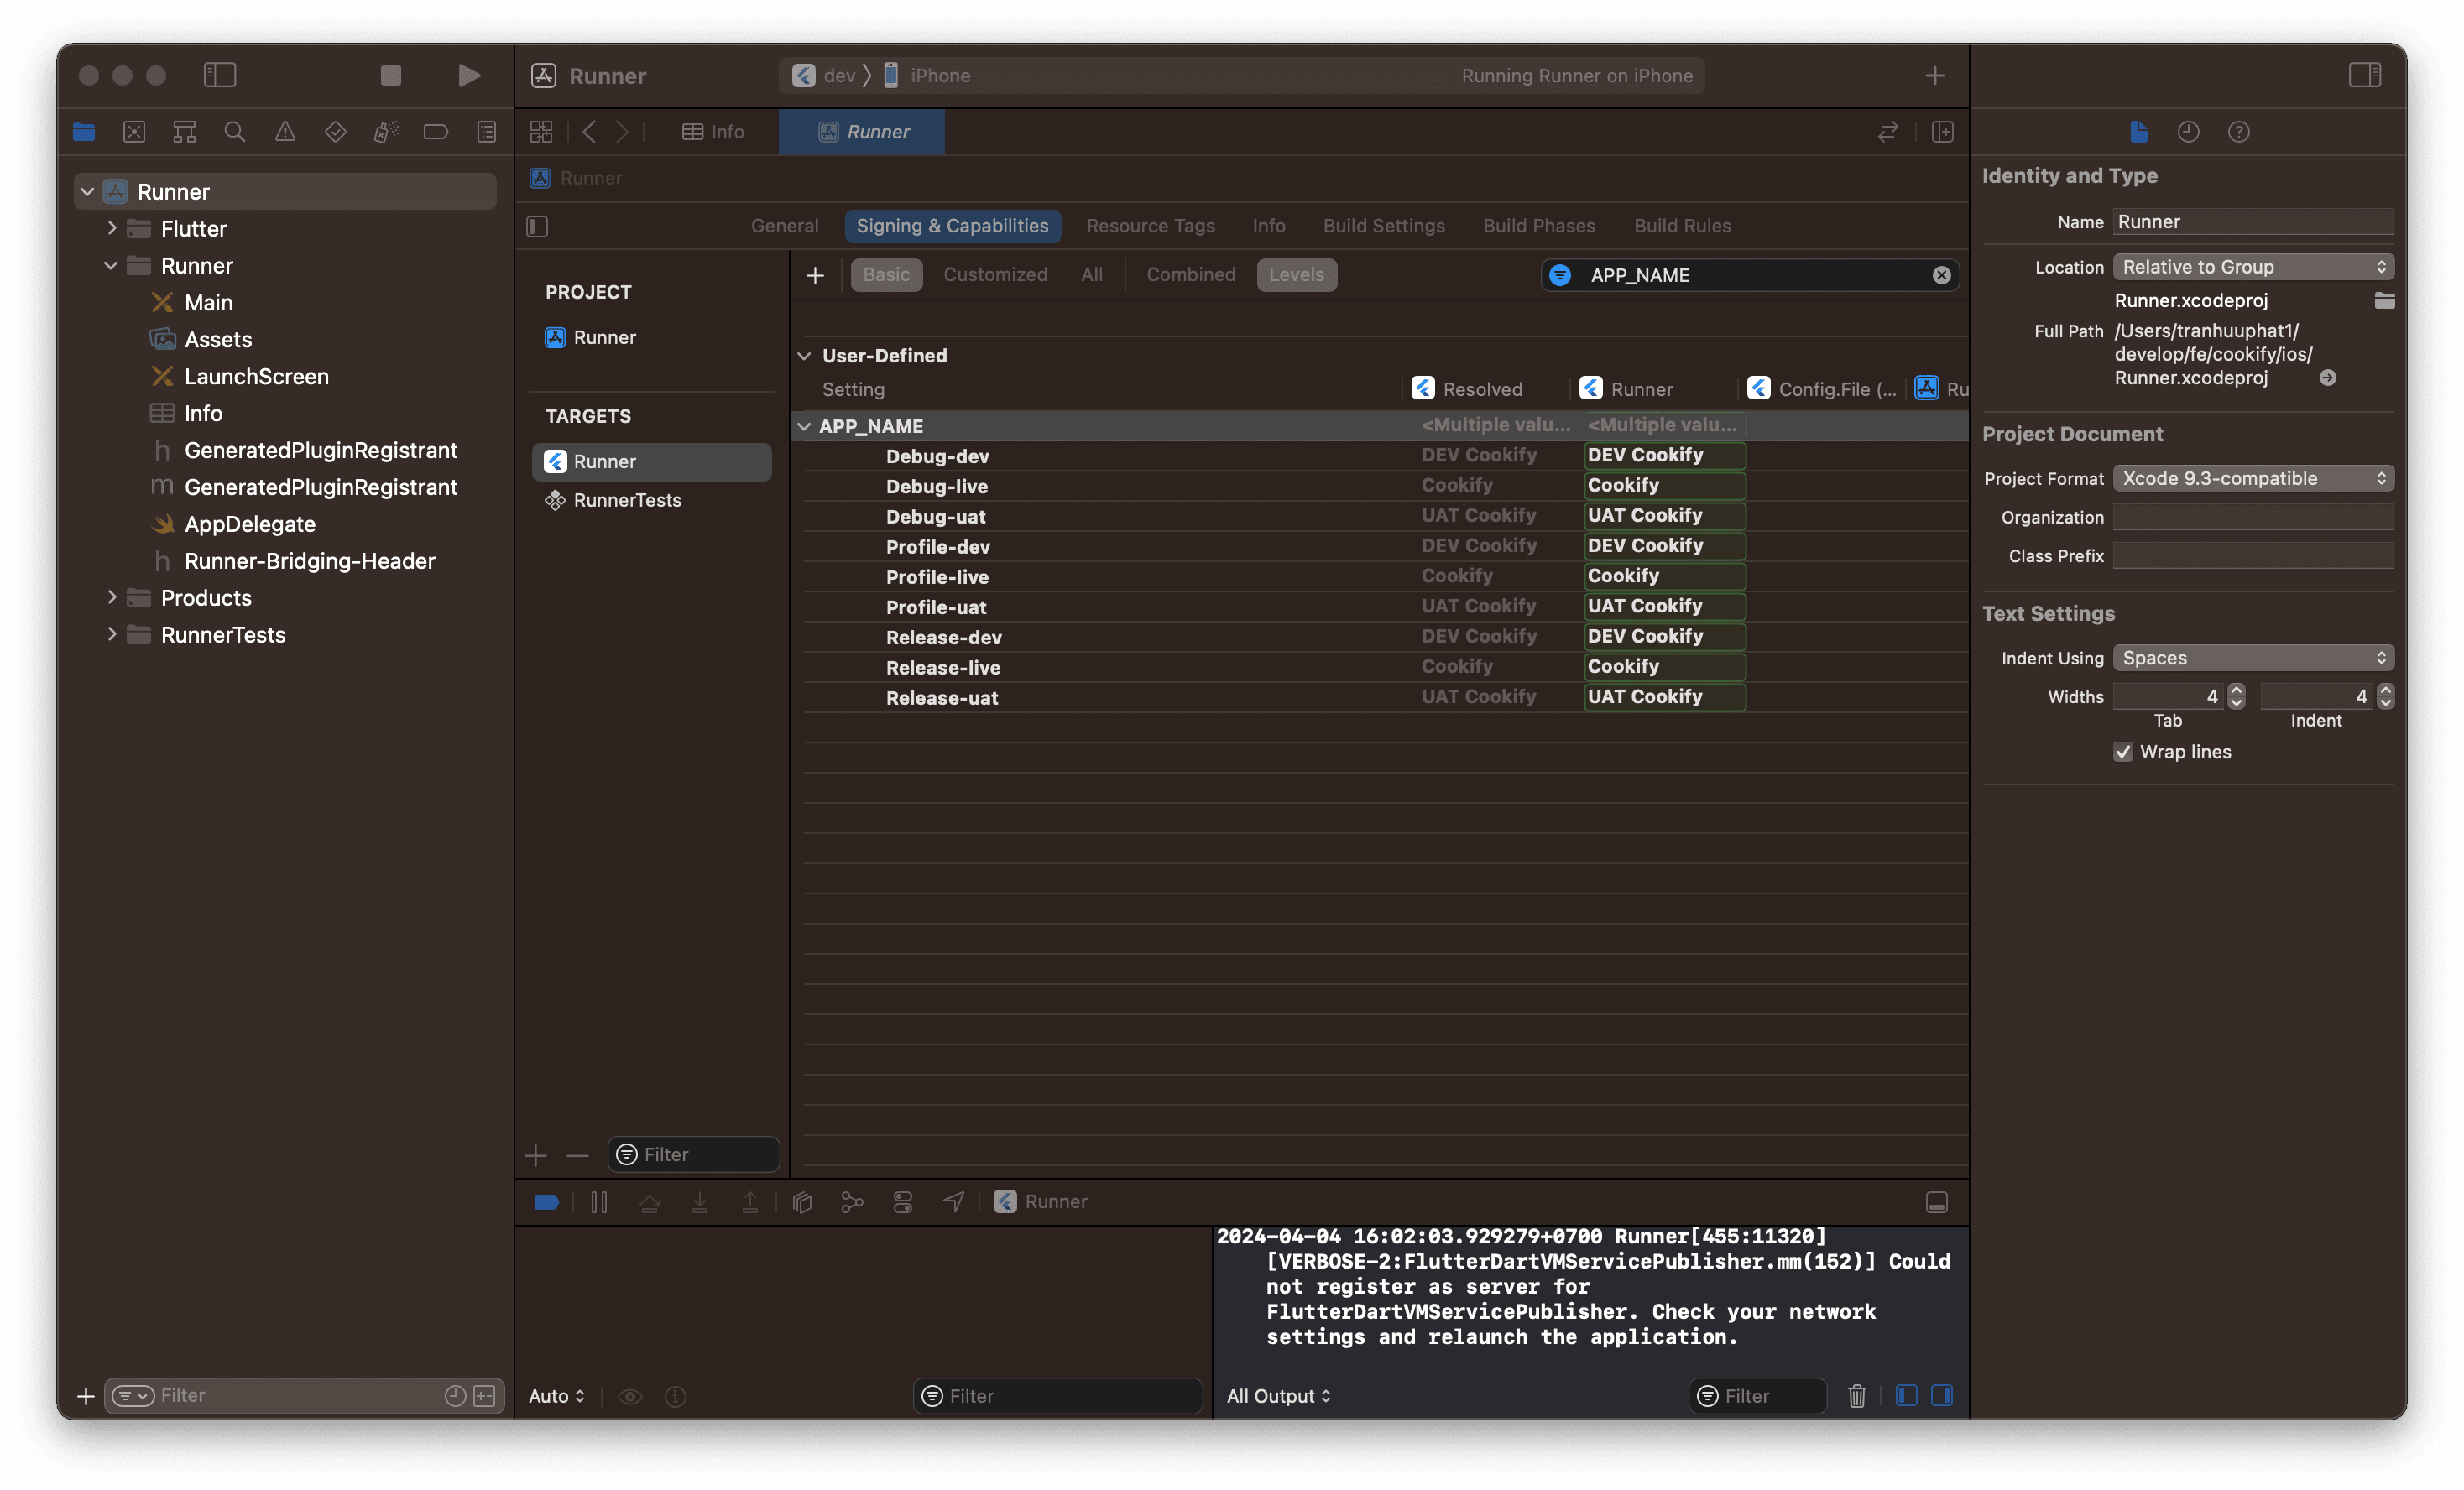
APP_NAME - Expand the row and set the name per build configuration:
- Debug-dev:
DEV Cookify - Debug-uat:
UAT Cookify - Debug-live:
Cookify - Profile-dev:
DEV Cookify - Profile-uat:
UAT Cookify - Profile-live:
Cookify - Release-dev:
DEV Cookify - Release-uat:
UAT Cookify - Release-live:
Cookify
- Debug-dev:
When done, it should look like this:
Set the bundle identifier per scheme
The bundle identifier is the iOS counterpart of the Android applicationId: giving each flavor its own id is what lets the three builds live on one phone.
- Stay in the
Build Settingstab - Search for
Product Bundle - Expand the
Product Bundle Identifiernode and set theBundle IDper build configuration:- Debug-dev:
com.andy.cookify.dev - Debug-uat:
com.andy.cookify.uat - Debug-live:
com.andy.cookify - Profile-dev:
com.andy.cookify.dev - Profile-uat:
com.andy.cookify.uat - Profile-live:
com.andy.cookify - Release-dev:
com.andy.cookify.dev - Release-uat:
com.andy.cookify.uat - Release-live:
com.andy.cookify
- Debug-dev:
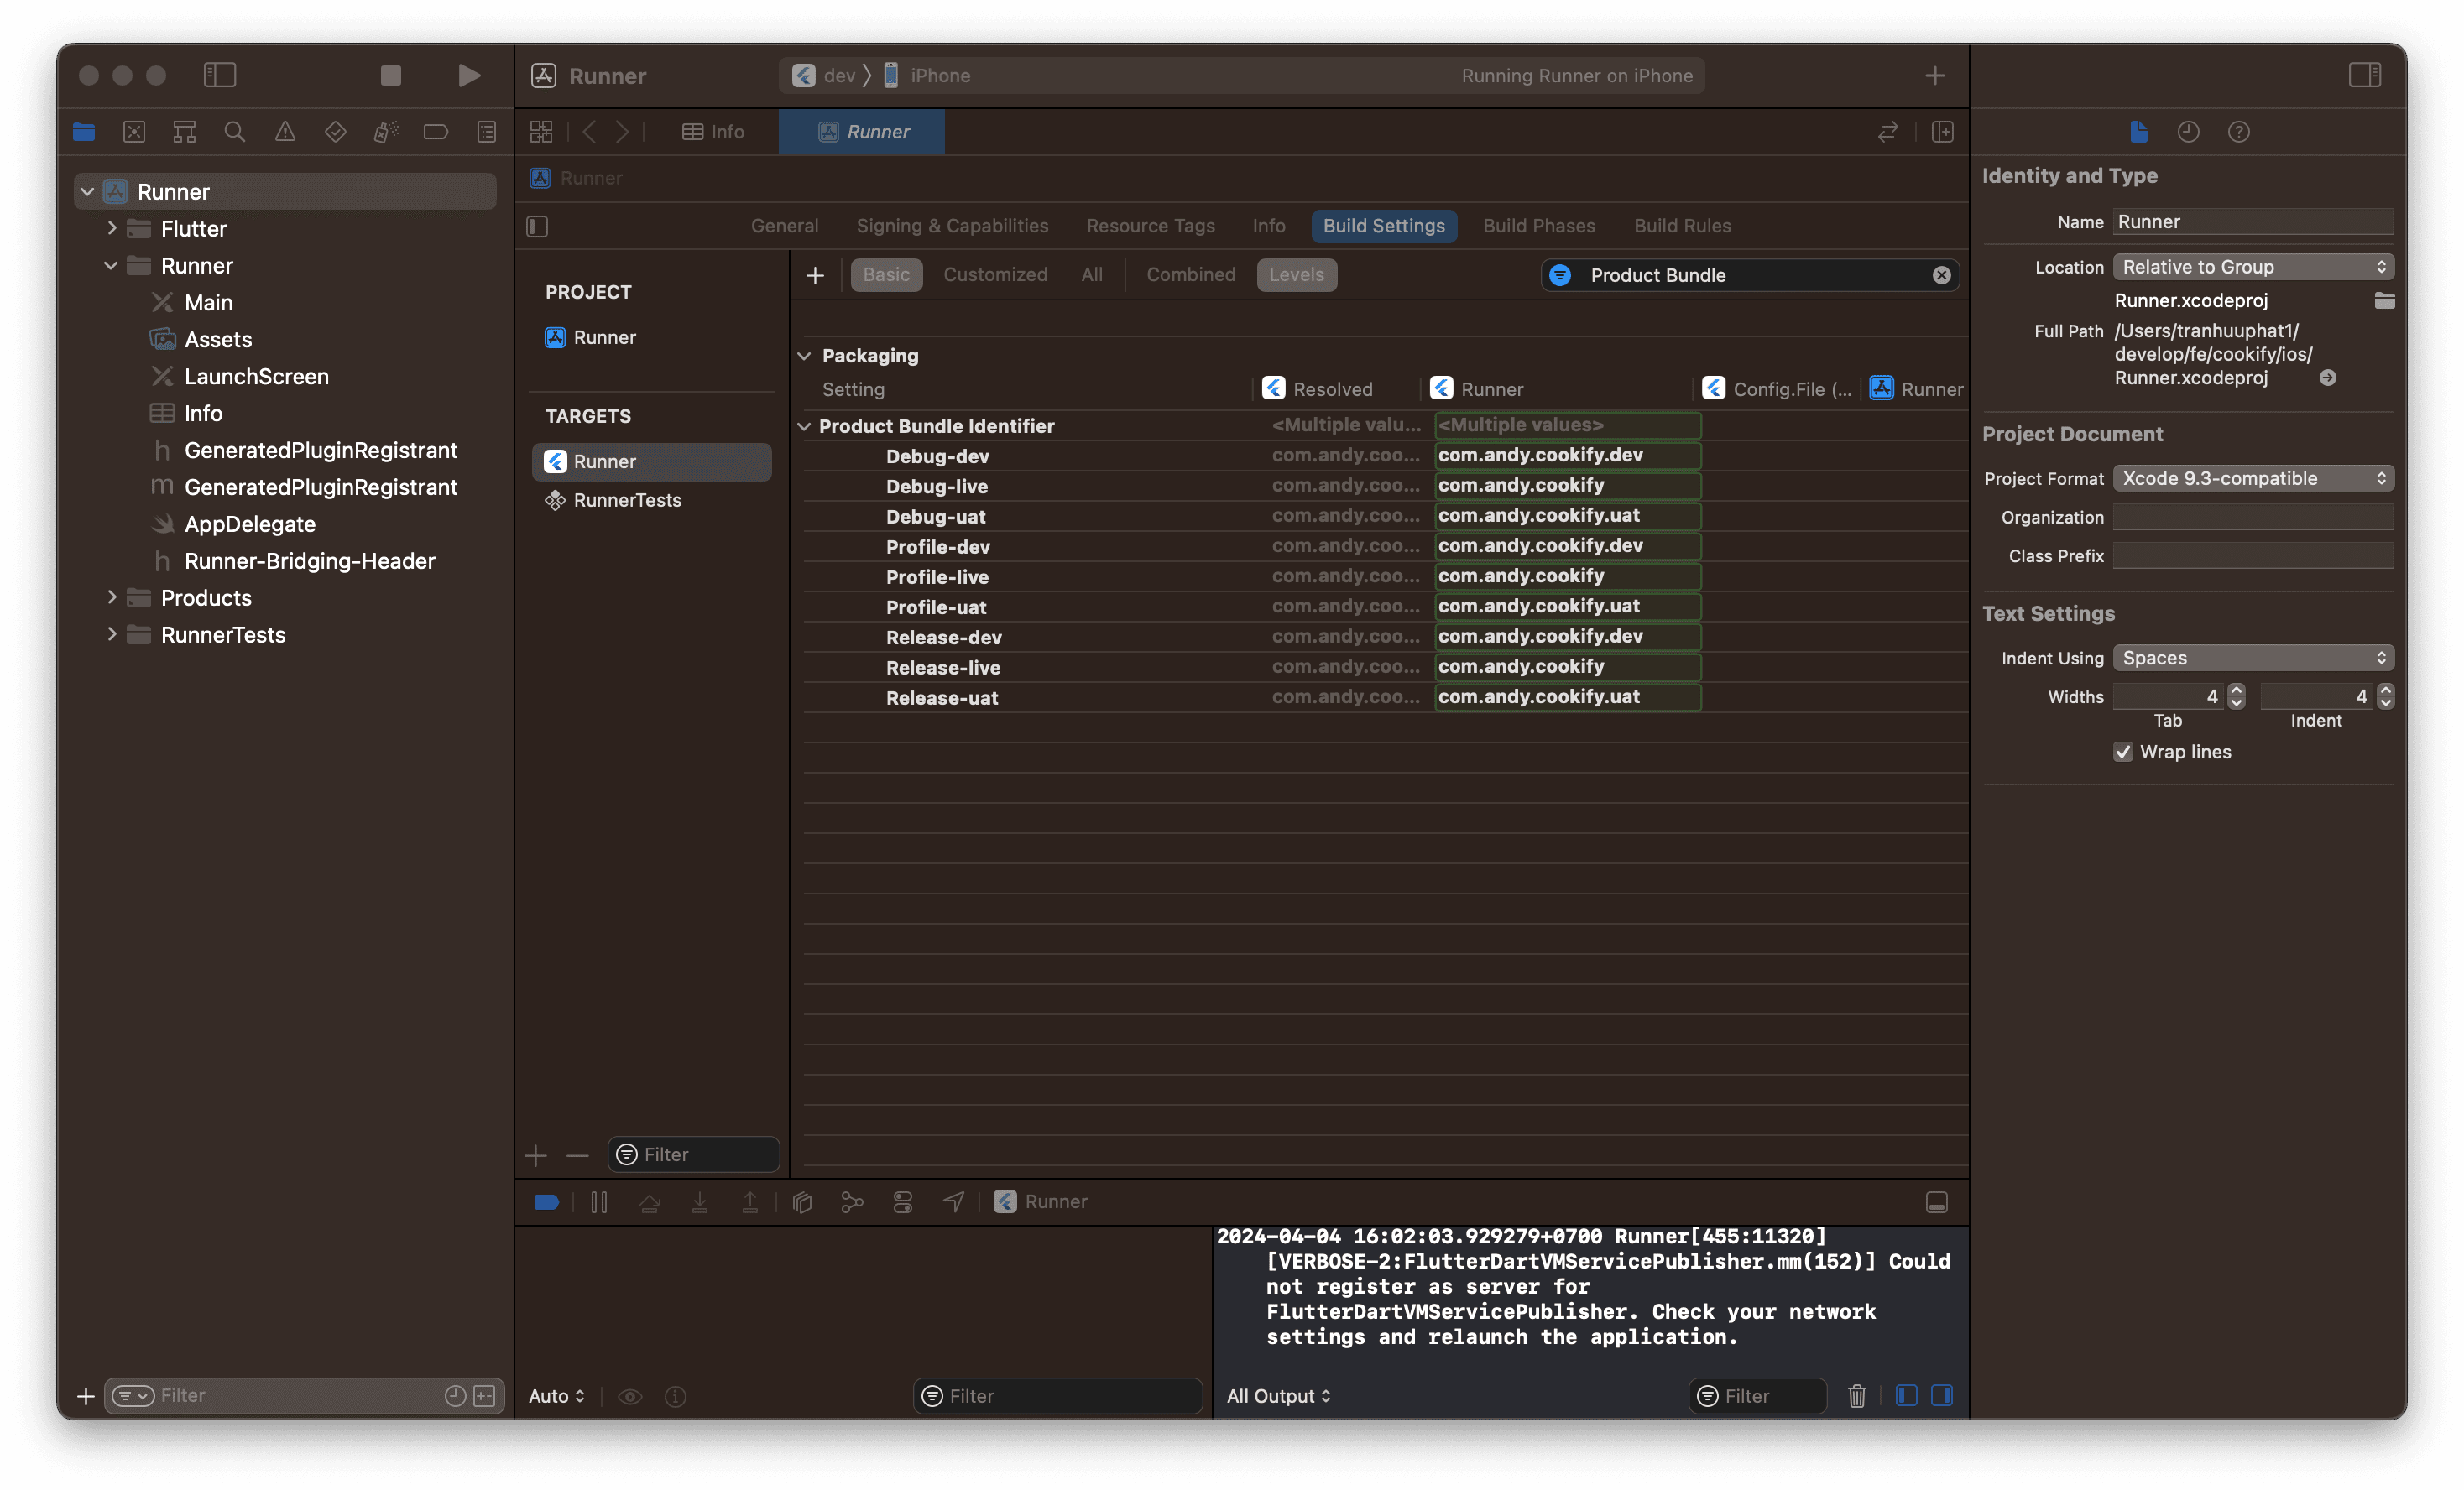
Add the method channel for iOS
Last step: the native half of the flavor method channel that the Dart code from the Android part calls at startup. Open Runner/AppDelegate.swift in Xcode. The finished file looks like this:
import UIKit
import Flutter

@main
@objc class AppDelegate: FlutterAppDelegate {
  override func application(
    _ application: UIApplication,
    didFinishLaunchingWithOptions launchOptions: [UIApplication.LaunchOptionsKey: Any]?
  ) -> Bool {
    GeneratedPluginRegistrant.register(with: self)

    let controller = window?.rootViewController as! FlutterViewController

    let flavorChannel = FlutterMethodChannel(
      name: "flavor",
      binaryMessenger: controller.binaryMessenger)

    flavorChannel.setMethodCallHandler { call, result in
      switch call.method {
      case "getFlavor":
        result(Bundle.main.infoDictionary?["App - Flavor"])
      default:
        result(FlutterMethodNotImplemented)
      }
    }

    return super.application(application, didFinishLaunchingWithOptions: launchOptions)
  }
}
The handler answers getFlavor calls by reading Bundle.main.infoDictionary under the App - Flavor key we added earlier. Because that key resolves through $(APP_FLAVOR), each scheme reports its own value. (If your project template still uses @UIApplicationMain instead of @main, keep whichever attribute is already there.)
Now flutter build ios --flavor dev runs without the custom schemes error, and the same goes for uat and live. Like on Android, you can install all three builds side by side, each pointed at its own backend.