- Published on
Setting up Multiple environments in Flutter with Flavors - iOS
- Authors

- Name
- Phat Tran
I’m using Flutter v3.13.0 for this tutorial.
Setup flavors for iOS
Make sure you enrolled Apple Developer Program to run app on physical devices.
Unfortunately, setting up flavors in iOS is more complex and we’ll have to use XCode and its UI for most of the steps.
Let’s try building our app with a flavor for iOS now to see, what kind of error we get:
flutter build ios --flavor dev

The Xcode project does not define custom schemes. You cannot use the --flavor option.
This means, that on iOS we have to rely on a feature called “custom schemes” to represent our flutter flavors. Setting them up requires multiple steps.
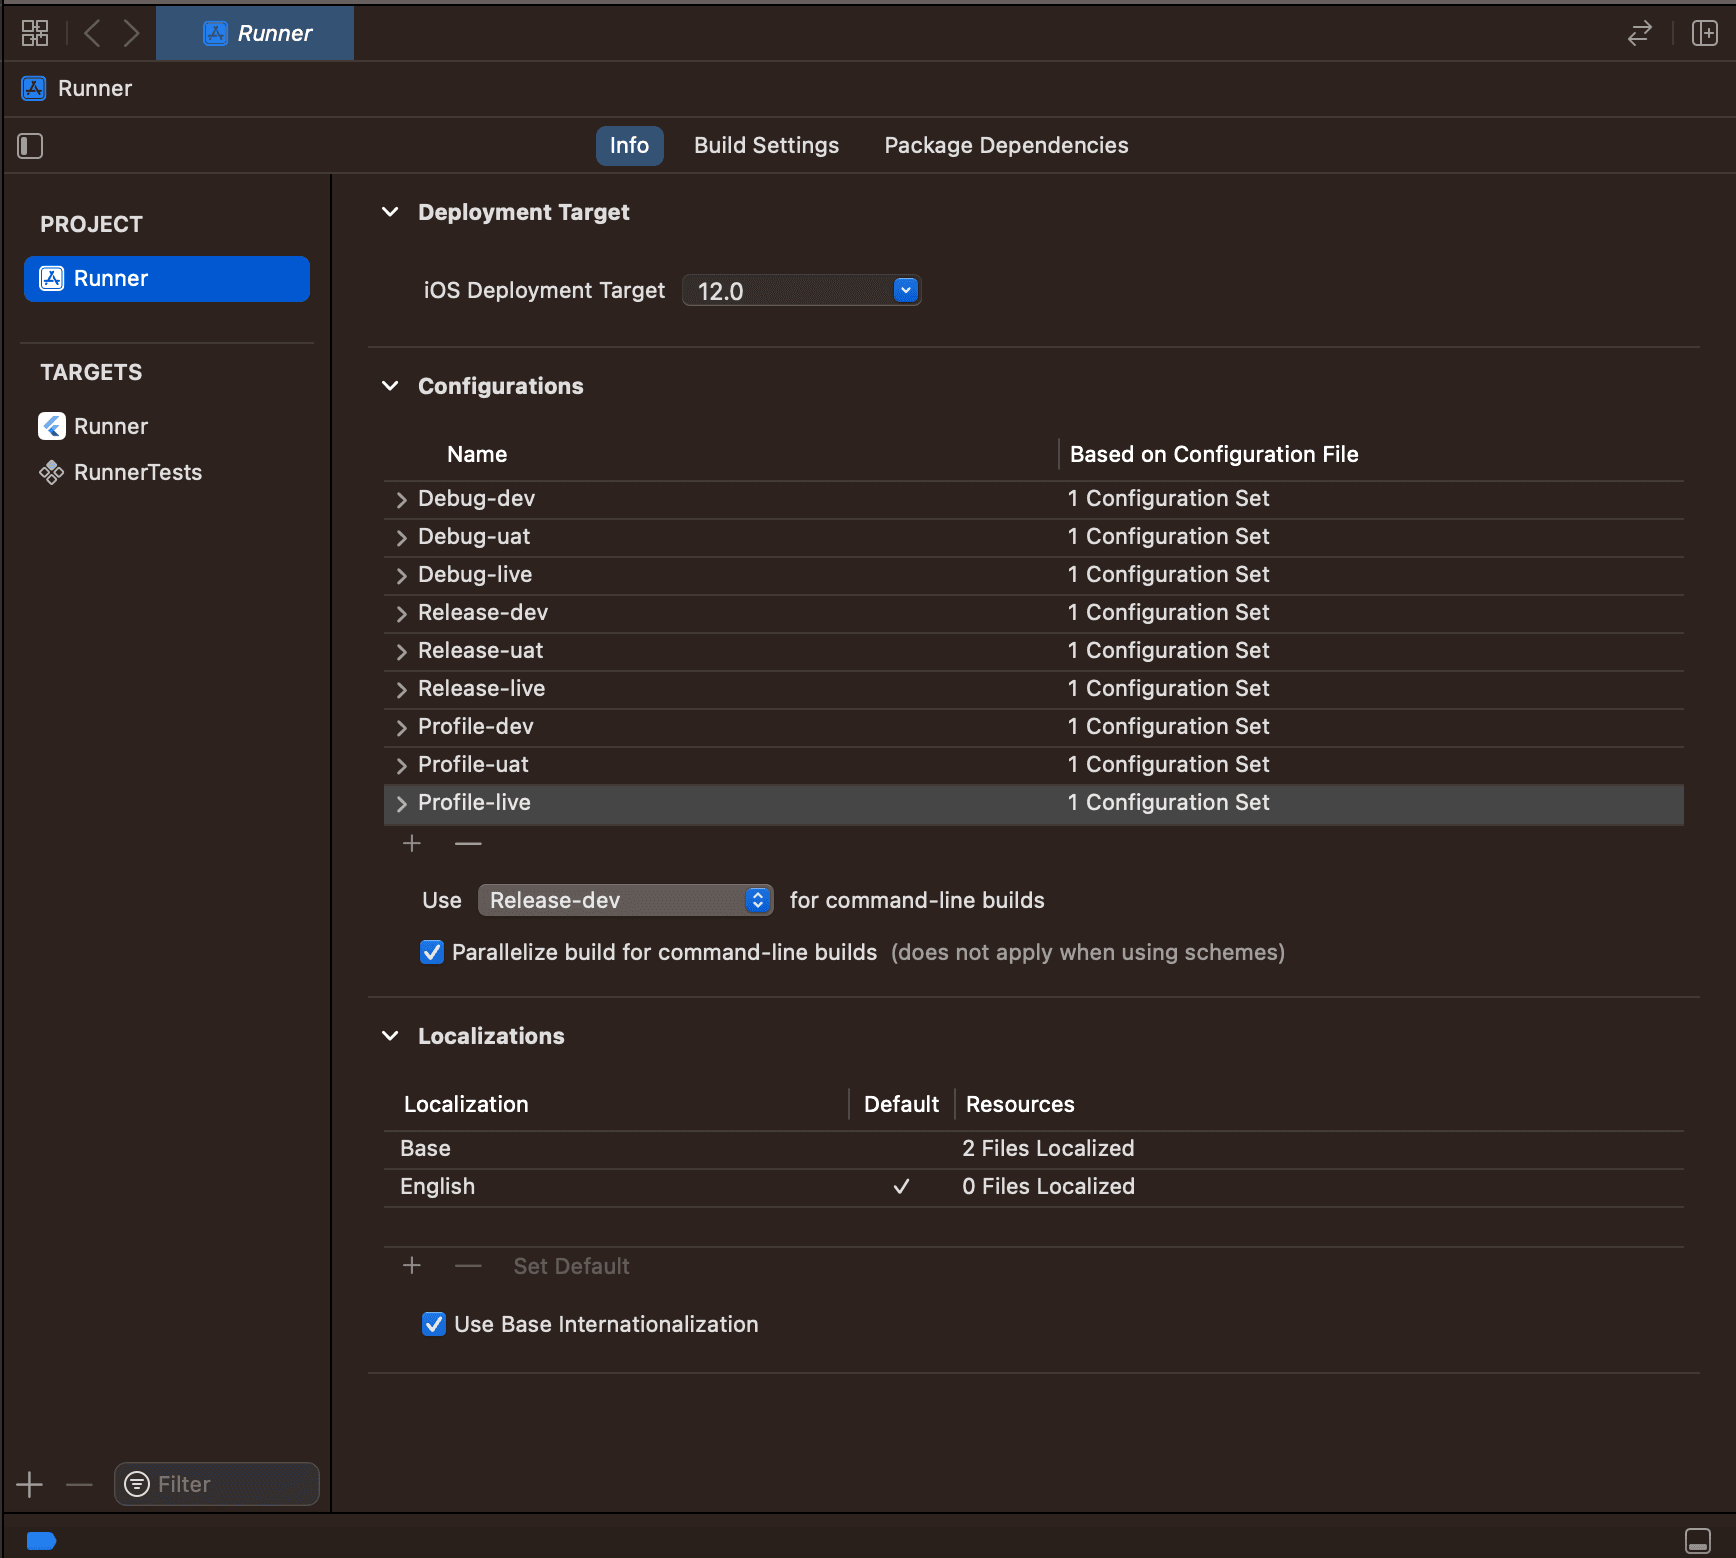
Setup Configurations
Make sure the root Runner node is selected in XCode
In the main window, select the Runner node below PROJECT (NOT below TARGETS)
Select the Info tab
In the Configurations section, do the following:
- Rename
DebugtoDebug-dev - Rename
ReleasetoRelease-dev - Rename
ProfiletoProfile-dev - Duplicate
Debug-devand rename it toDebug-uat - Duplicate
Release-devand rename it toRelease-uat - Duplicate
Profile-devand rename it toProfile-uat - Duplicate
Debug-devand rename it toDebug-live - Duplicate
Release-devand rename it toRelease-live - Duplicate
Profile-devand rename it toProfile-live - This means, for every flavor, we need a separate
Debug,Release&Profileconfiguration.
Assign Build Configurations to Custom Schemes
Now we can set up the actual custom schemes by doing the following:
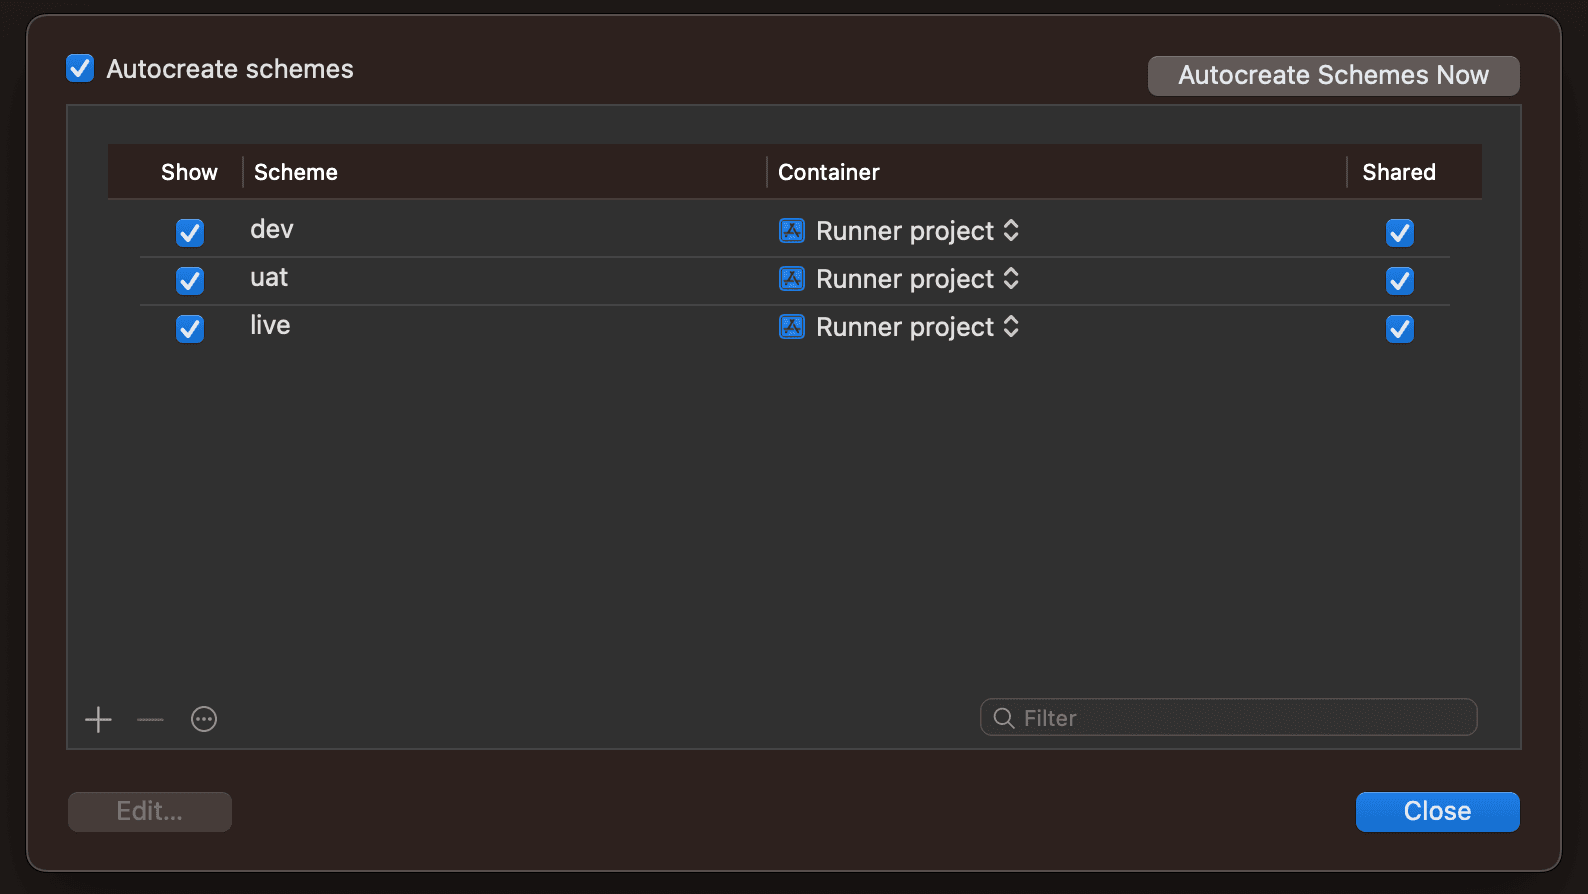
- Make sure the root
Runnernode is selected in XCode - Select
Product -> Scheme -> Manage Schemes…in the main toolbar. - To setup the
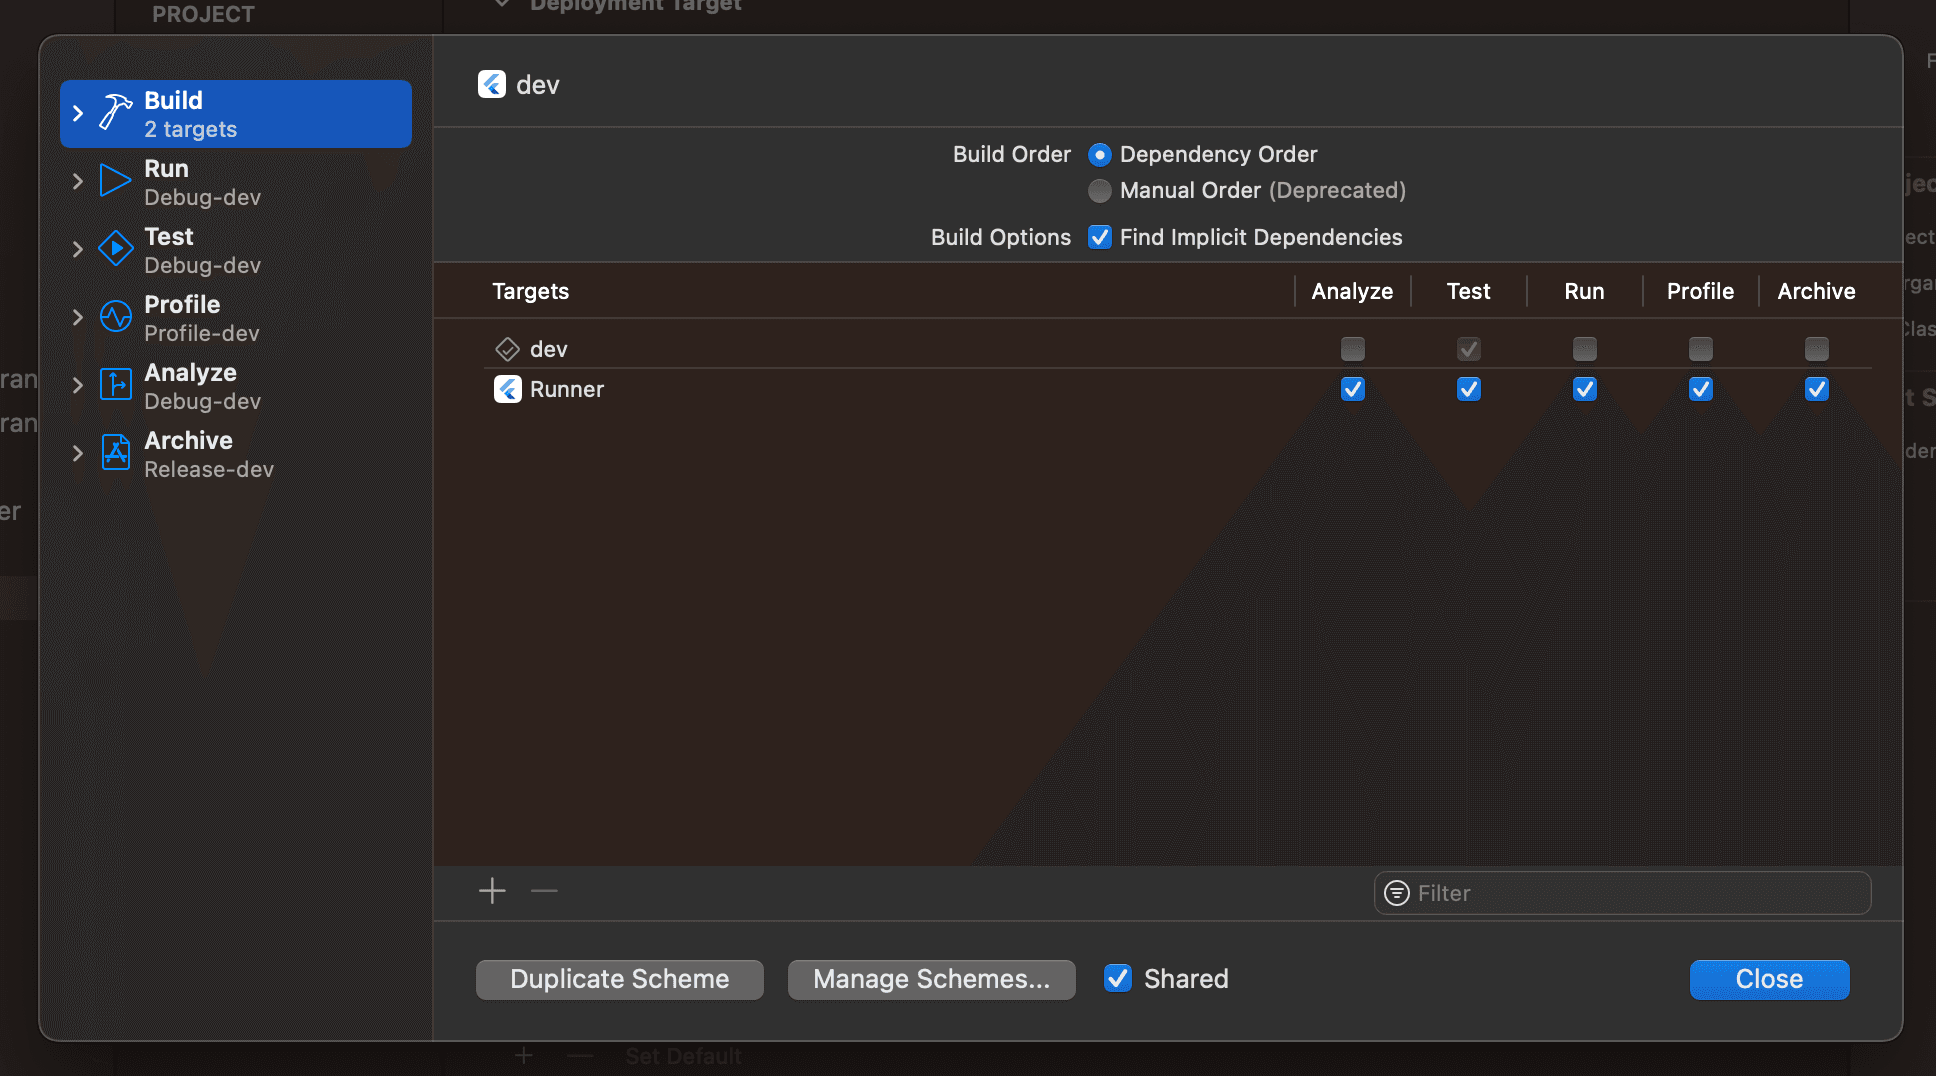
devscheme:- Select the
Runnerscheme, click on the settings-icon in the top left and selectDuplicate - Rename the scheme to
dev - Make sure
Sharedis selected - Adjust the build configuration to the corresponding
-devversion
- Select the
- Similar to setup the
uatandlivescheme:- Select the
Runnerscheme again, click on the settings-icon in the top left and selectDuplicate - Rename the scheme to
live - For each of the sections (
Run,Test,Profile,Analyze,Archive) on the left, change the build configuration to the corresponding-uatand-liveversion. - Make sure
Sharedis selected - Close the dialog
- Select the
Setup Flavor value per scheme
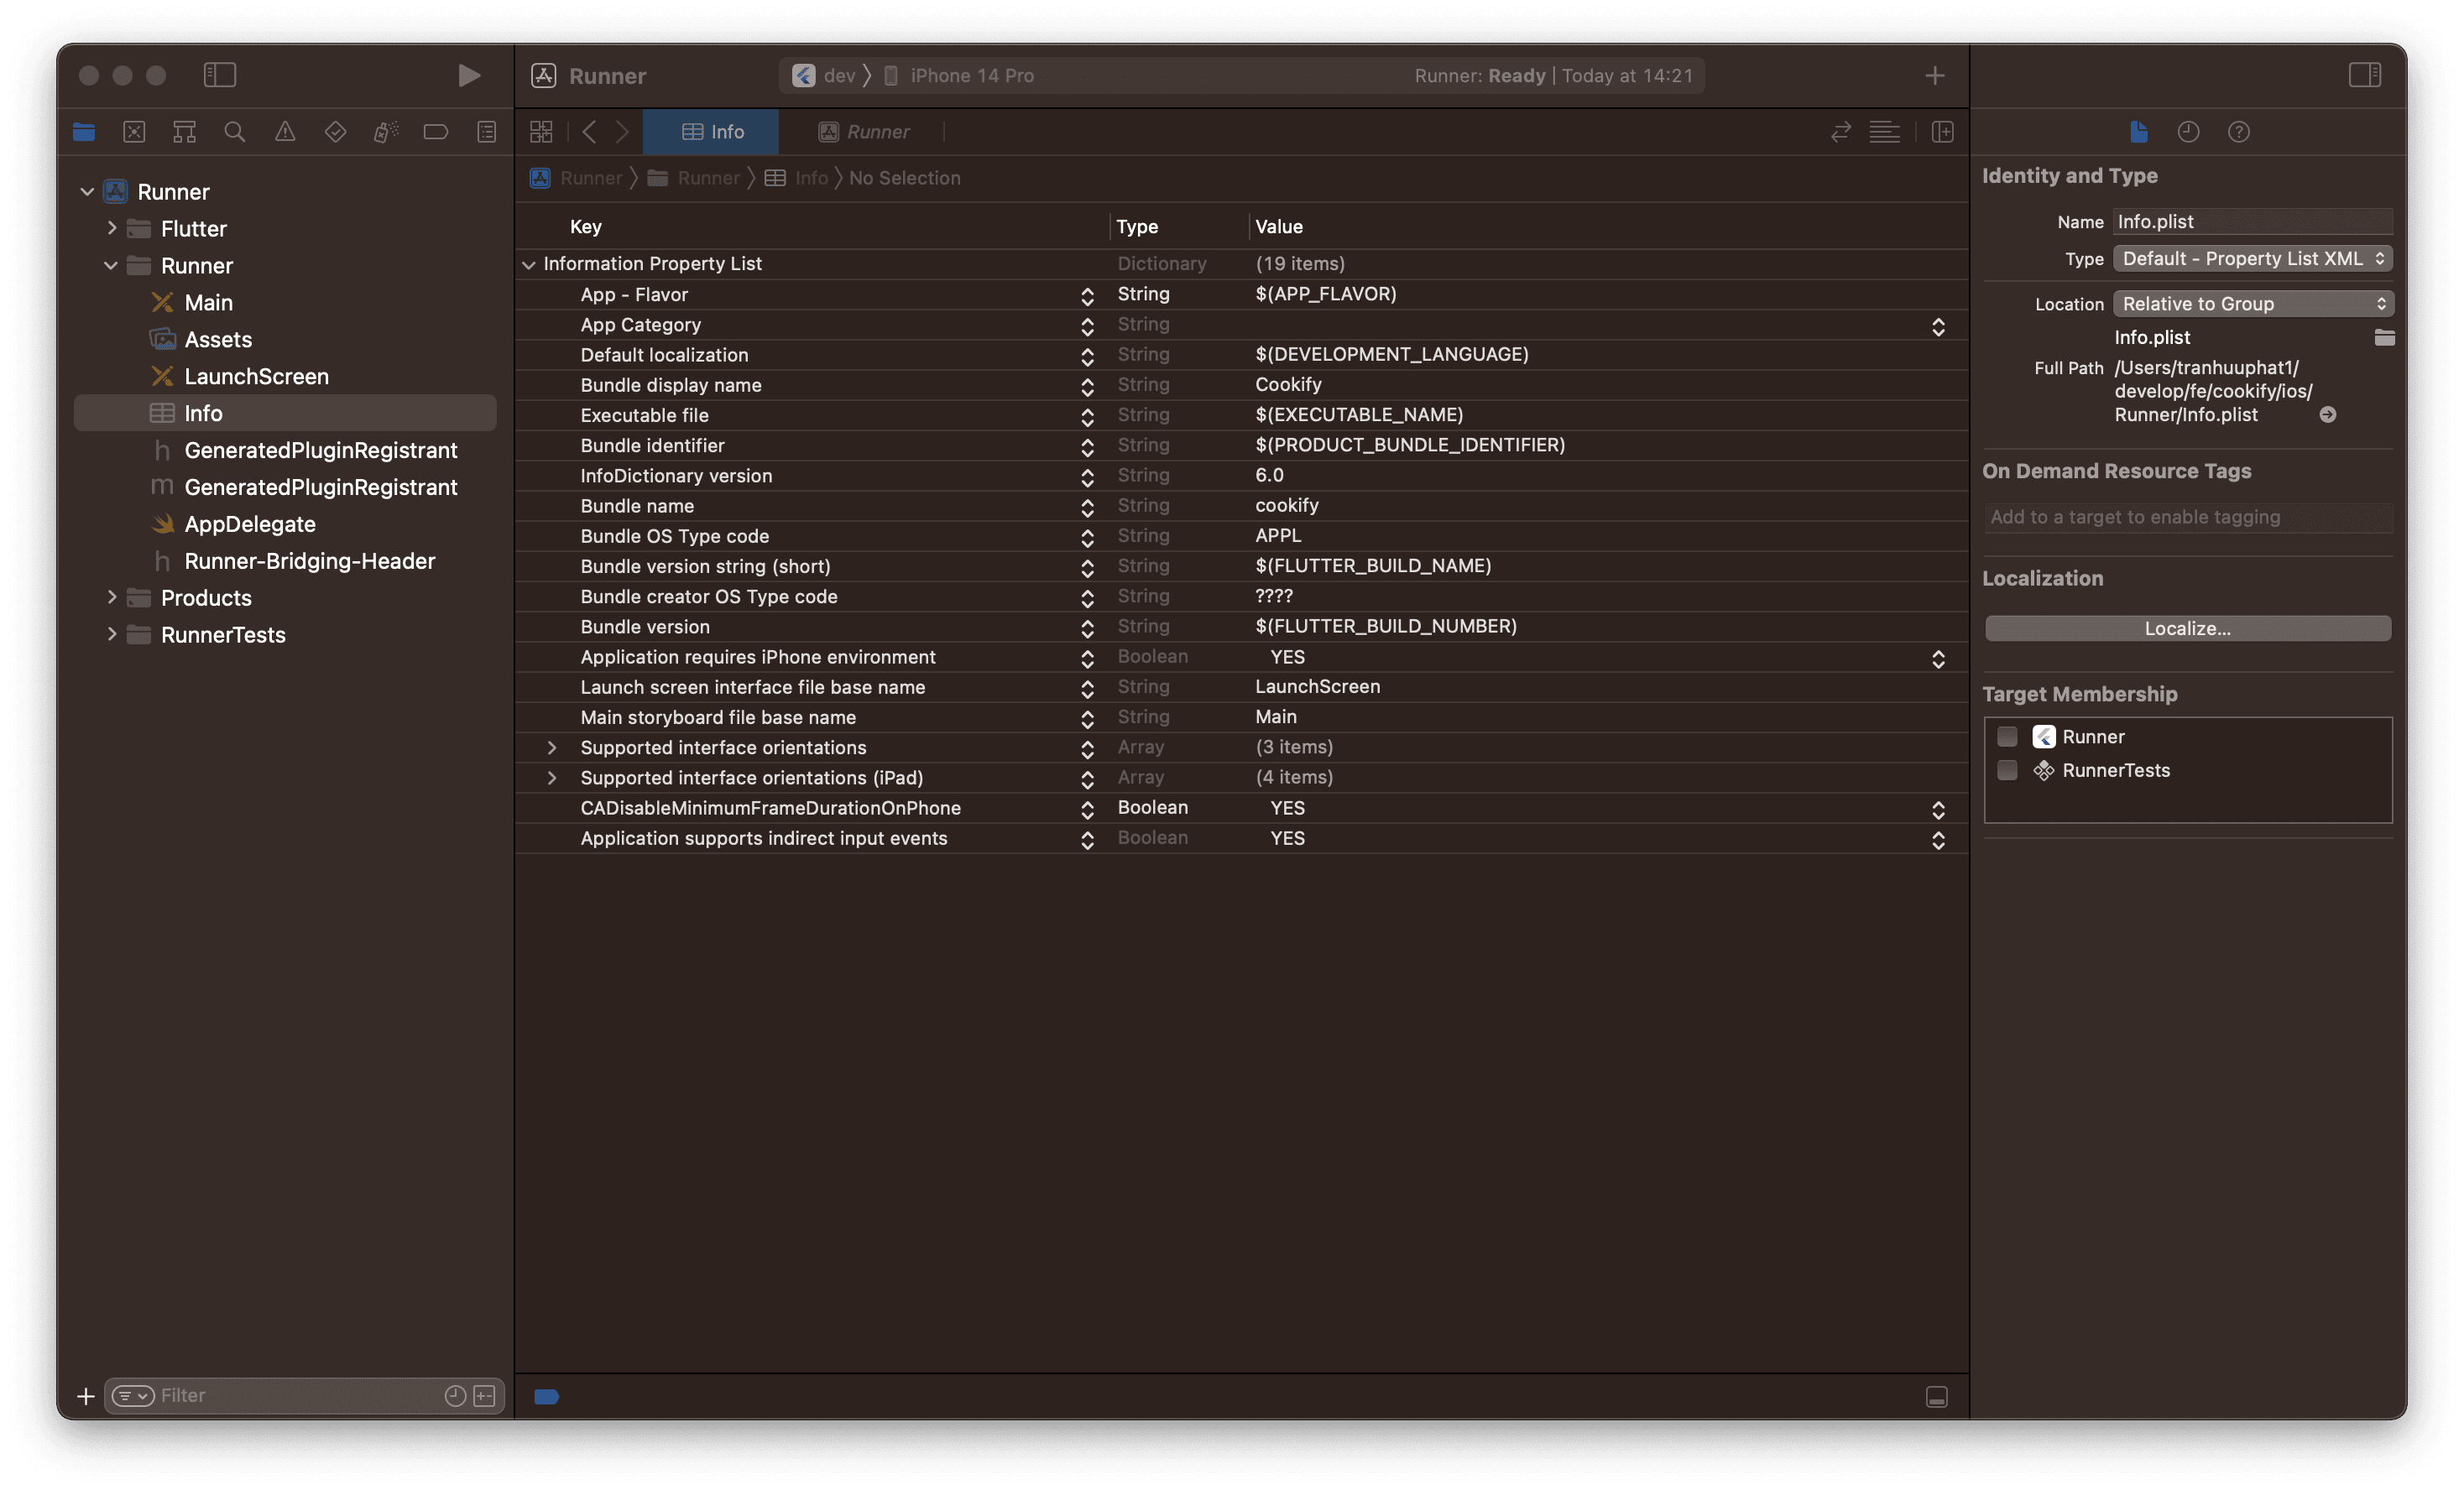
The Bundle.main.infoDictionary from before refers to the Runner/Info.plist file and App - Flavor is a custom key that we have to add there manually next.
So open the Runner/Info.plist file in XCode and and add a new row with the following settings:
- Key:
App - Flavor - Type:
String - Value:
$(APP_FLAVOR)
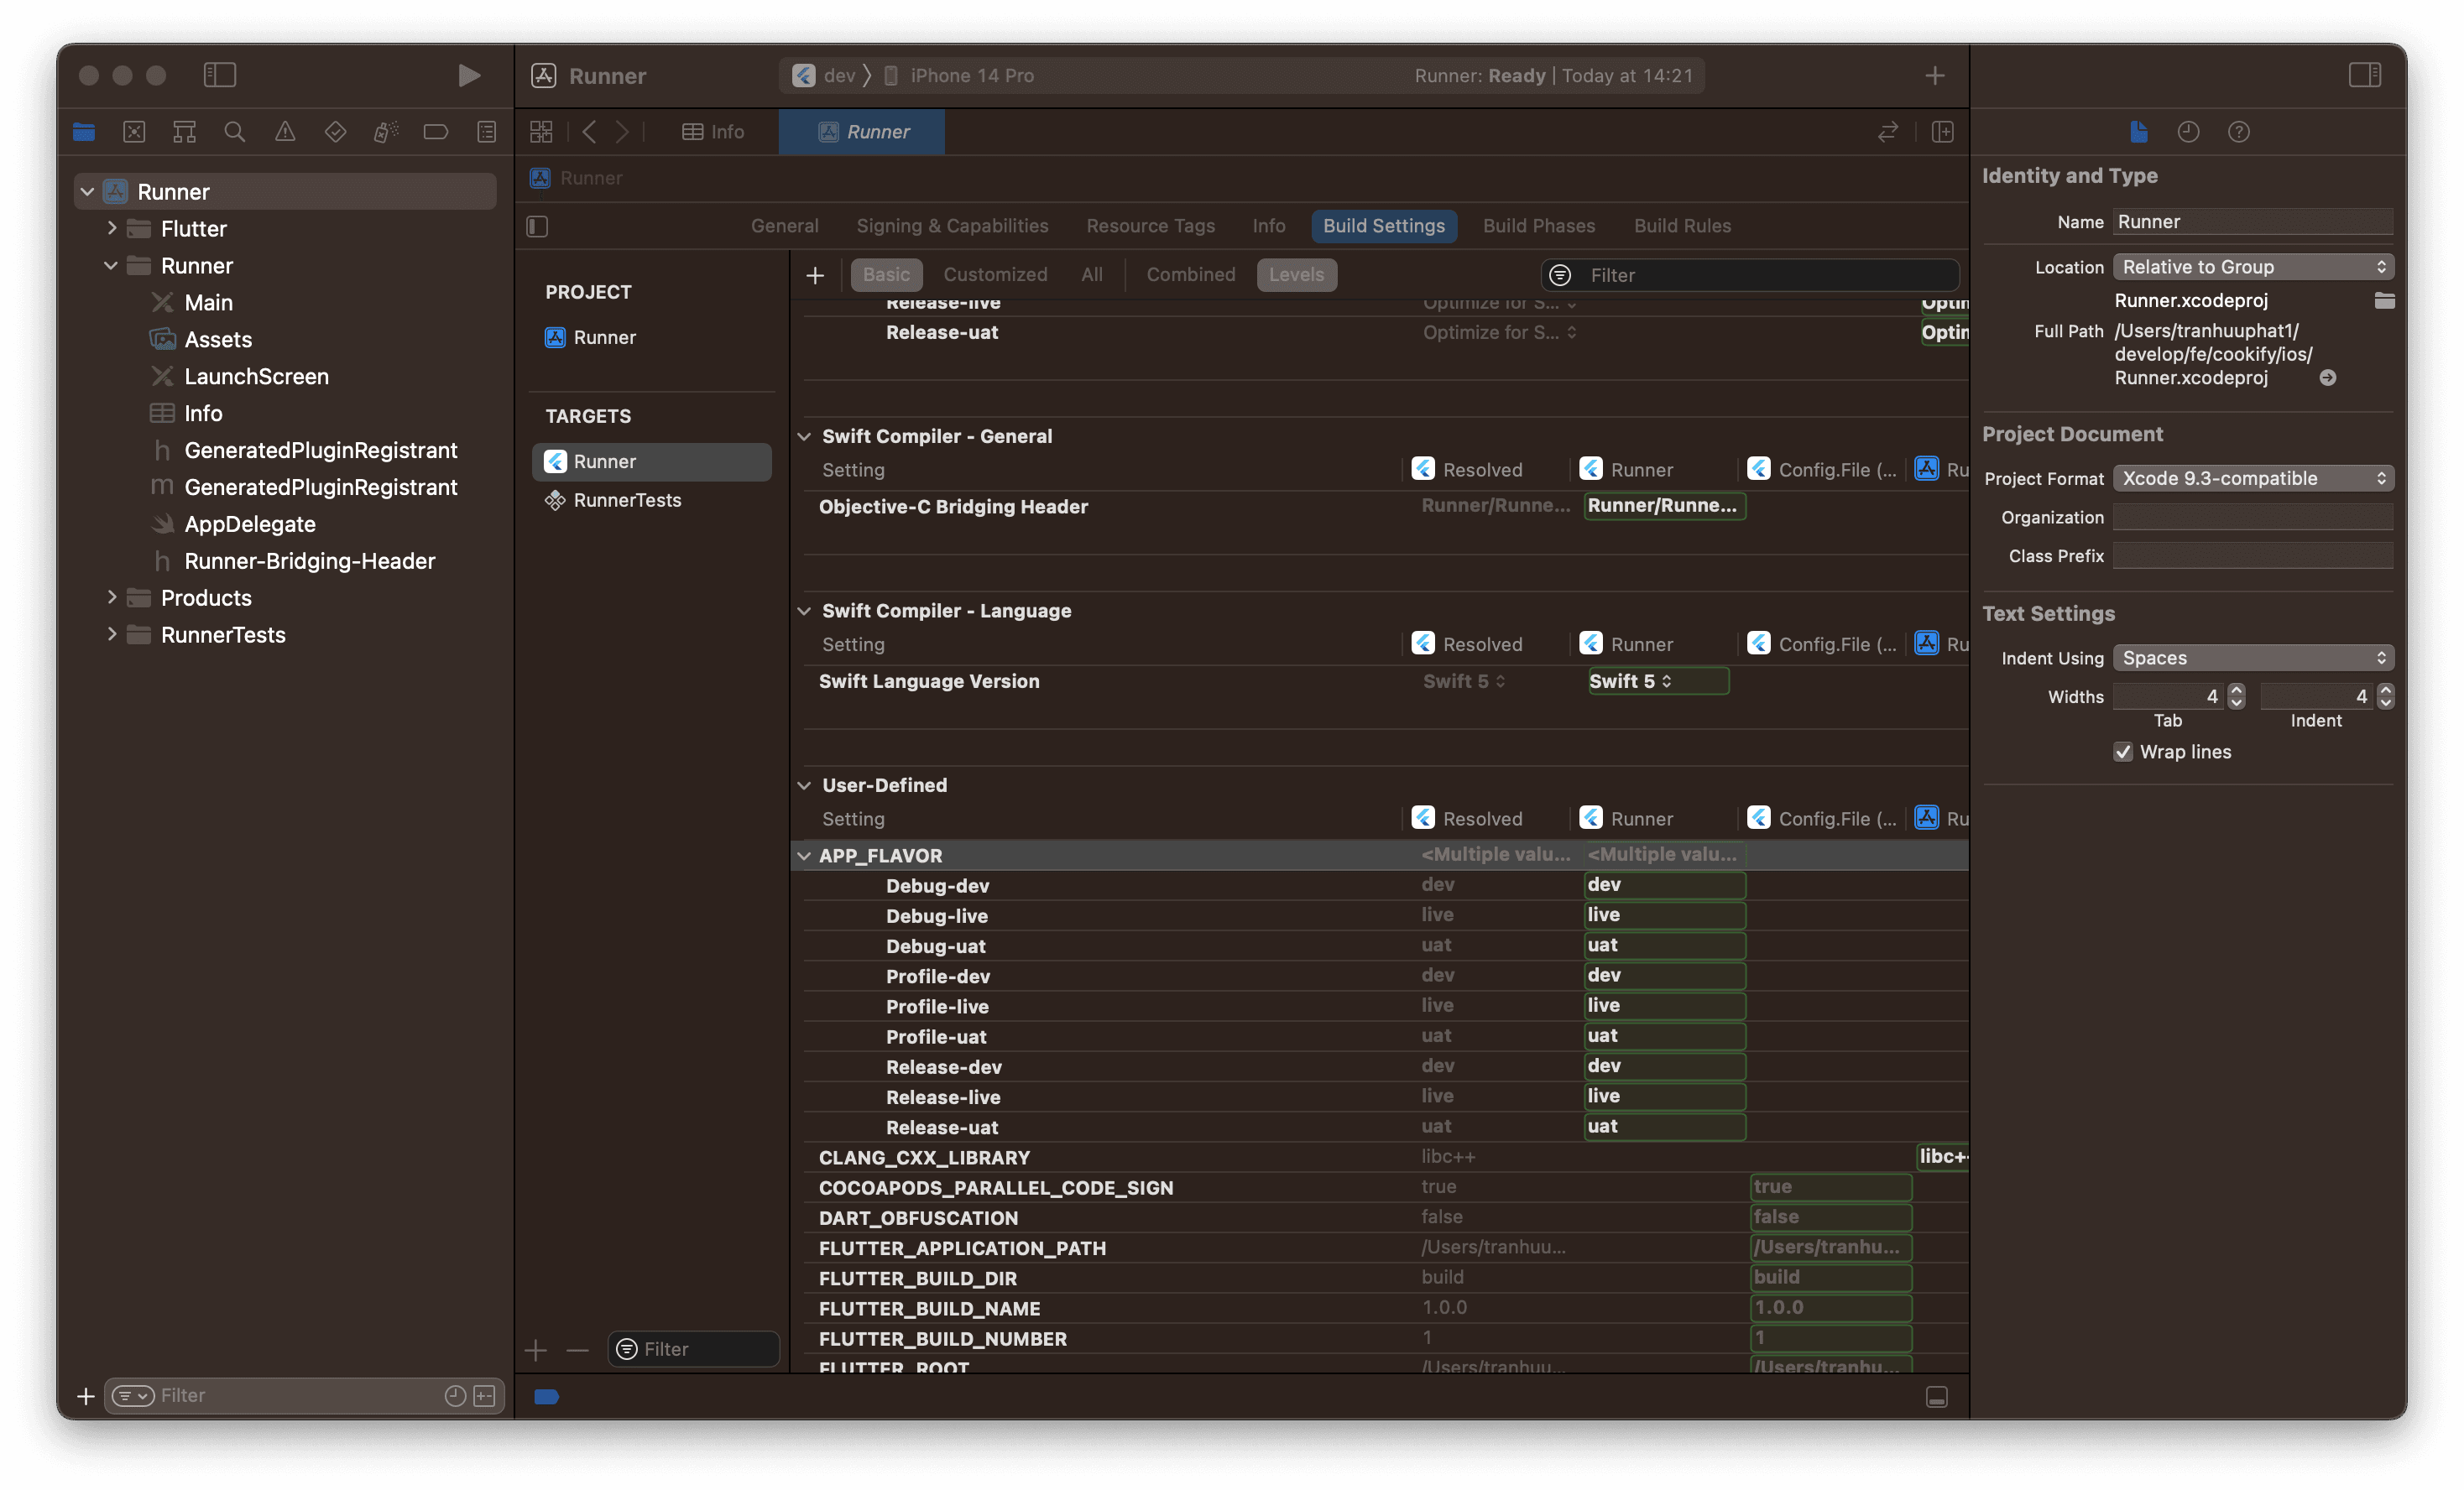
We now have the key but we still don’t have the actual flavor-specific values per scheme. To add them, we now have to do the following:
- Select the root
Runnernode in your XCode project structure - Select
RunnerbelowTARGETS - Select the
Build settingstab - Click on the + to add a new
User-definedsetting - Name it
APP_FLAVOR - Expand the node by clicking on the little arrow on the left of the row and add the actual flavor value to each build configuration:
- Debug-dev:
dev - Debug-uat:
uat - Debug-live:
live - Profile-dev:
dev - Profile-uat:
uat - Profile-live:
live - Release-dev:
dev - Release-uat:
uat - Release-live:
live
- Debug-dev:
When done, it should look like this:
Setup App Name value per scheme
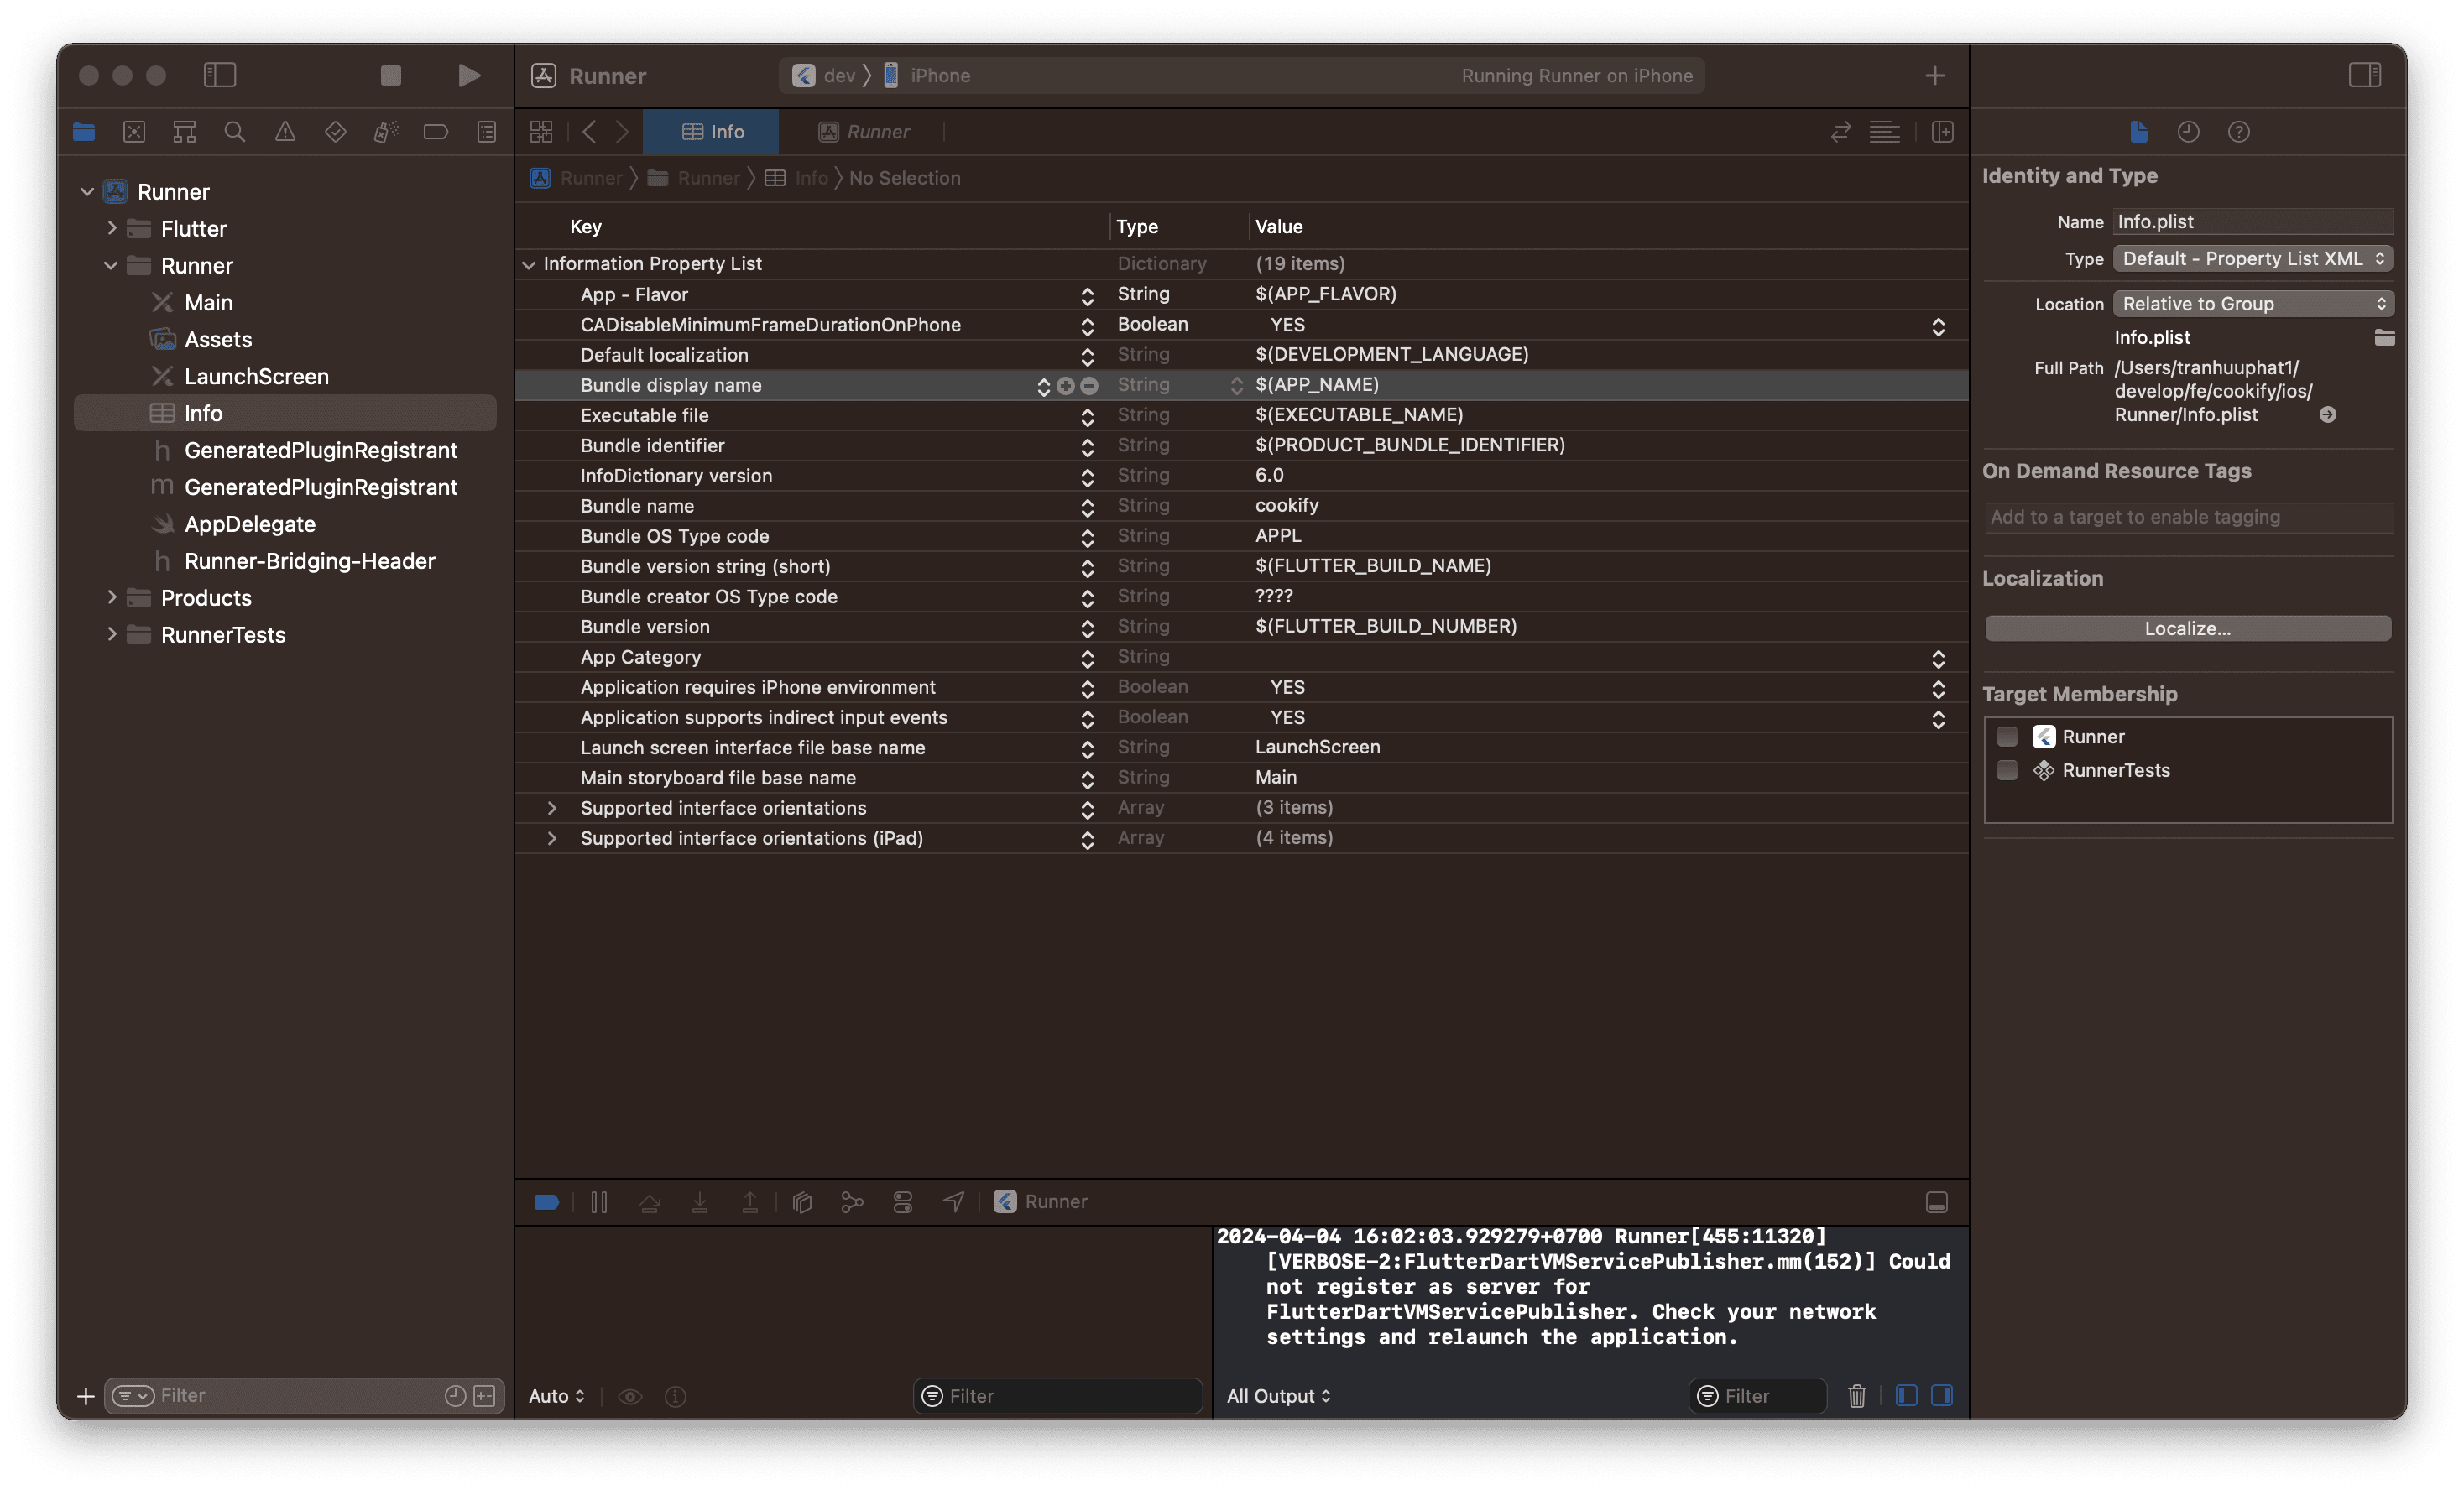
So open the Runner/Info.plist file in XCode and and modify Bundle display name with the following settings:
- Key:
Bundle display name - Type:
String - Value:
$(APP_NAME)
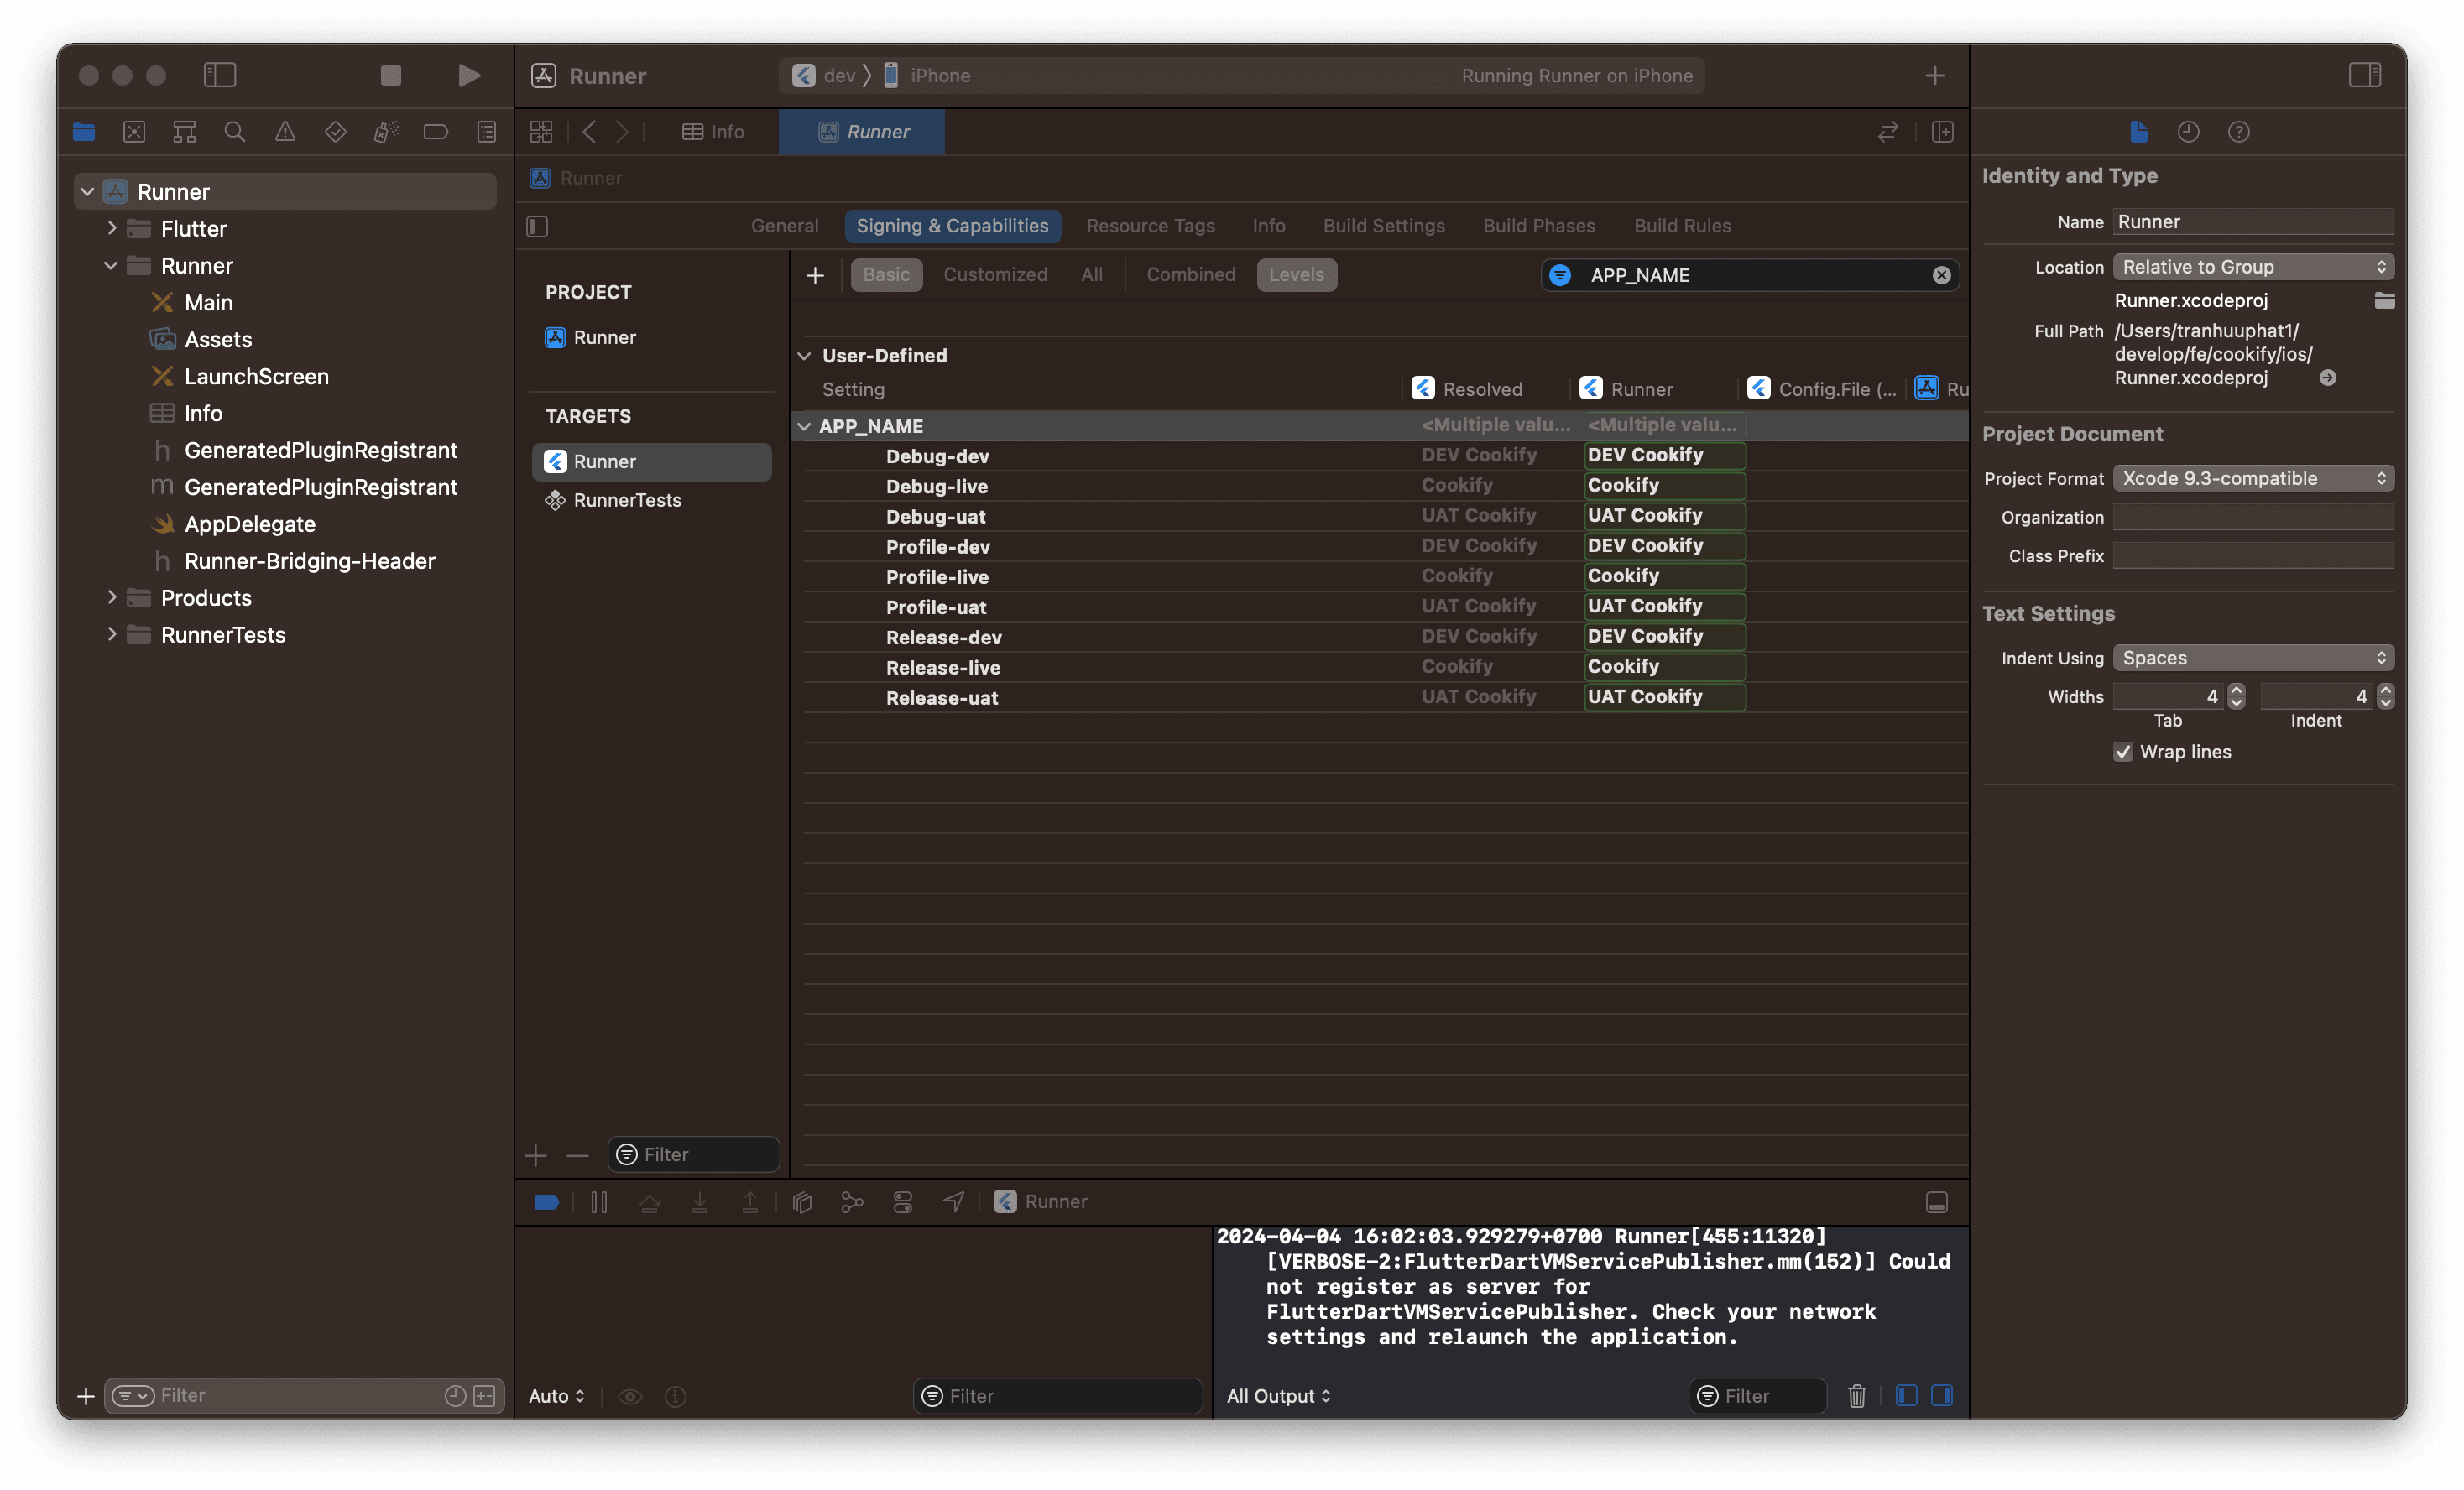
We now have the key but we still don’t have the actual flavor-specific values per scheme. To add them, we now have to do the following:
- Select the root
Runnernode in your XCode project structure - Select
RunnerbelowTARGETS - Select the
Build settingstab - Click on the + to add a new
User-definedsetting - Name it
APP_NAME - Expand the node by clicking on the little arrow on the left of the row and add the actual flavor value to each build configuration:
- Debug-dev:
DEV Cookify - Debug-uat:
UAT Cookify - Debug-live:
Cookify - Profile-dev:
DEV Cookify - Profile-uat:
UAT Cookify - Profile-live:
Cookify - Release-dev:
DEV Cookify - Release-uat:
UAT Cookify - Release-live:
Cookify
- Debug-dev:
When done, it should look like this:
Setup Bundle Identifier value per scheme
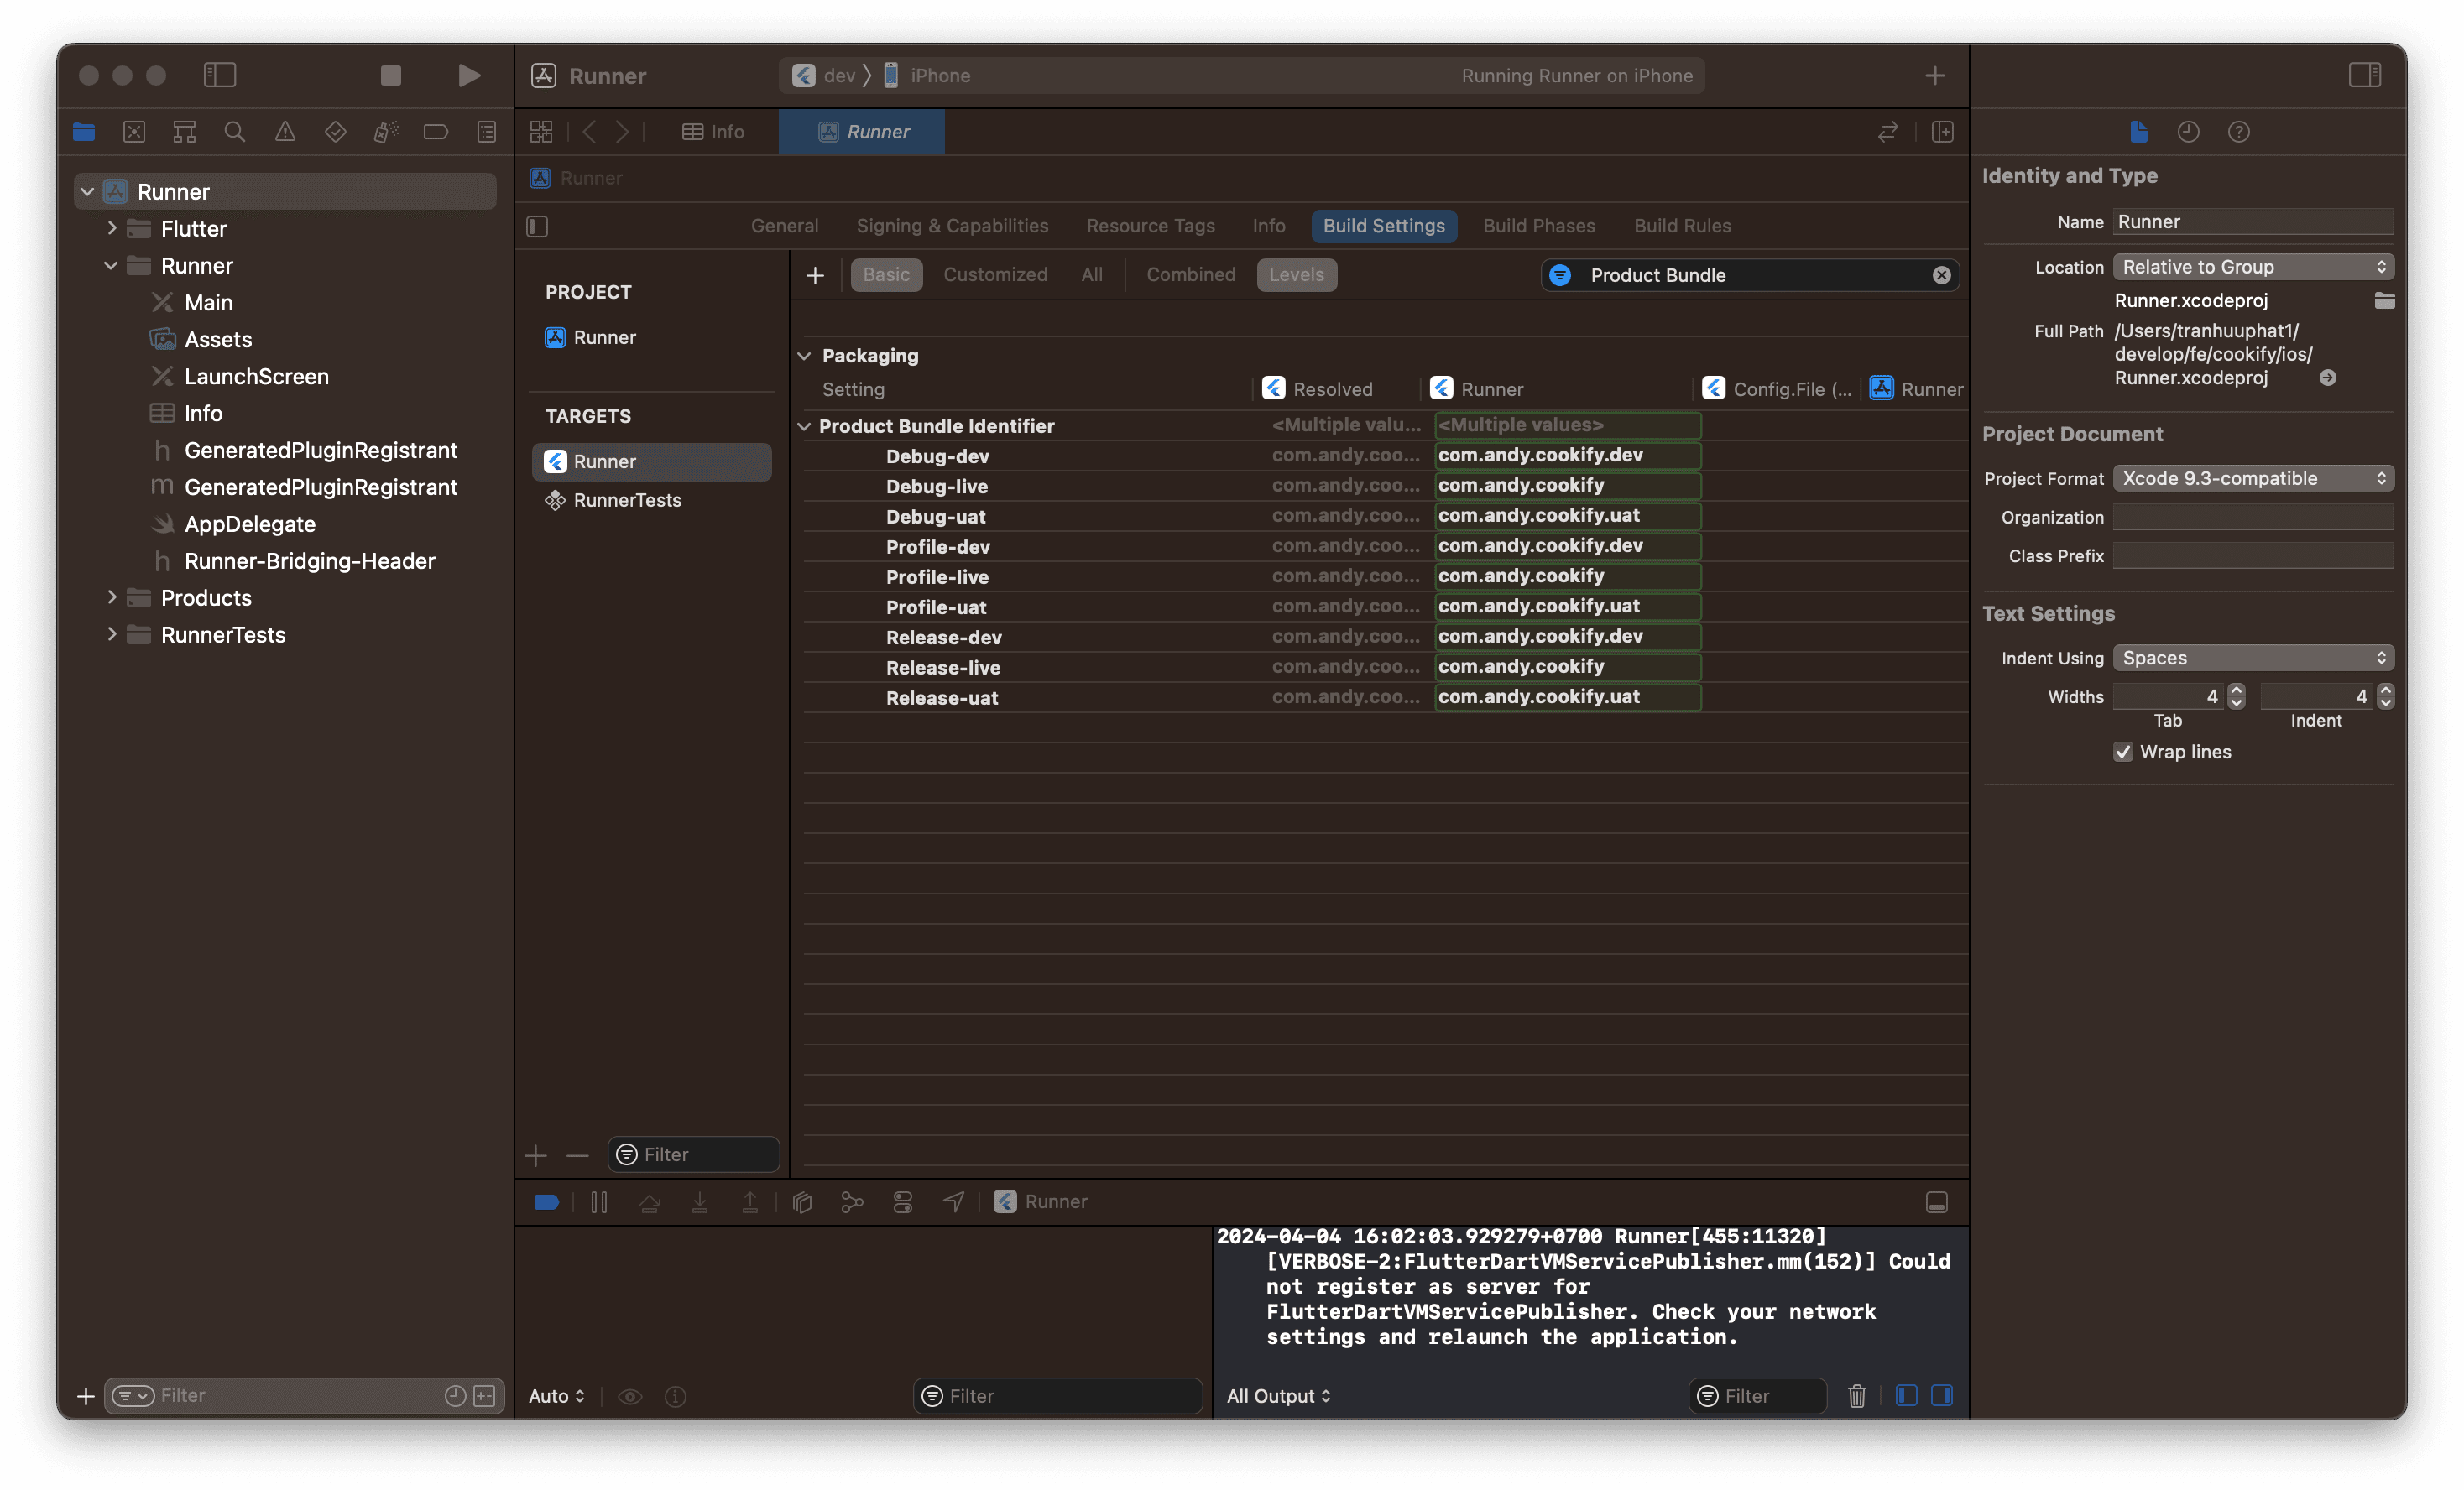
- At the
Build Settingstab - Search
Product Bundle - Expand the node
Product Bundle Identifierand modify actualBundle IDvalue to each build configuration:- Debug-dev:
com.andy.cookify.dev - Debug-uat:
com.andy.cookify.uat - Debug-live:
com.andy.cookify - Profile-dev:
com.andy.cookify.dev - Profile-uat:
com.andy.cookify.uat - Profile-live:
com.andy.cookify - Release-dev:
com.andy.cookify.dev - Release-uat:
com.andy.cookify.uat - Release-live:
com.andy.cookify
- Debug-dev:
Adding the method channel for iOS
We need to add some code to the Runner/AppDelegate.swift in XCode. The finished file should look like this:
import UIKit
import Flutter

@UIApplicationMain
@objc class AppDelegate: FlutterAppDelegate {
  override func application(
    _ application: UIApplication,
    didFinishLaunchingWithOptions launchOptions: [UIApplication.LaunchOptionsKey: Any]?
  ) -> Bool {
    GeneratedPluginRegistrant.register(with: self)

    let controller = window.rootViewController as! FlutterViewController

    let flavorChannel = FlutterMethodChannel(
        name: "flavor",
        binaryMessenger: controller.binaryMessenger)

    flavorChannel.setMethodCallHandler({(call: FlutterMethodCall, result: @escaping FlutterResult) -> Void in
        // Note: this method is invoked on the UI thread
        let flavor = Bundle.main.infoDictionary?["App - Flavor"]
        result(flavor)
    })

    return super.application(application, didFinishLaunchingWithOptions: launchOptions)
  }
}
This will set up a method channel handler that reads the current flavor from a Bundle.main.infoDictionary with a key called App - Flavor.